The reviews of WII-CLIP
PS: After you finish your review, please mail to
wiiclip@gmail.com
, we will post it to here ASAP :)
Now you can click here to download the whole review file by zipped.
--------------------------------------------------------
Review by Flash78 :
|
 por
Flash78 26 Abr 2008 14:18 por
Flash78 26 Abr 2008 14:18
En la anterior review que realizé del Wiiclip solo pude analizar la
version V1 destinada al D2cKey, ahora de nuevo gracias a Jixo y
Chipspain.com
he podido analizar la gran mayoria de versiones y poder compararlas:
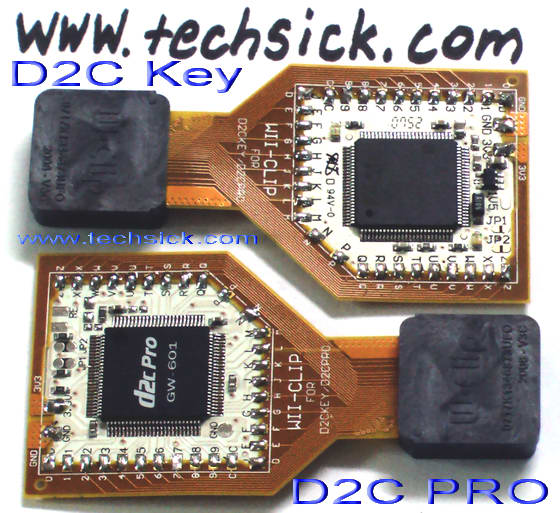
- Wii-Clip V1 + D2cKey
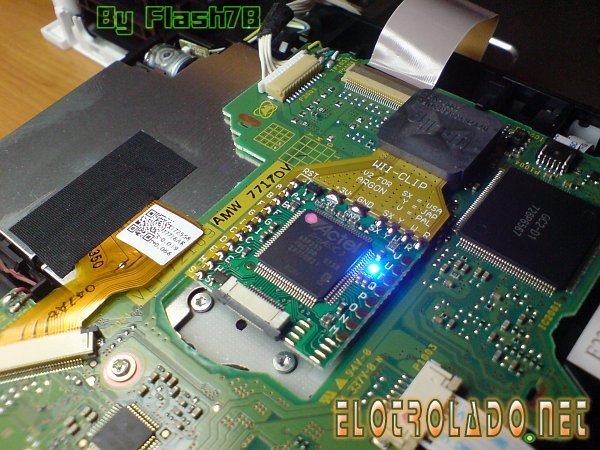
- Wii-Clip V2 + Argon
- Wii-Clip V3 + Wiikey
- Wii-Clip V4 + D2Pro
- Wii-Clip V5 + Wasabi
- Key-Clip
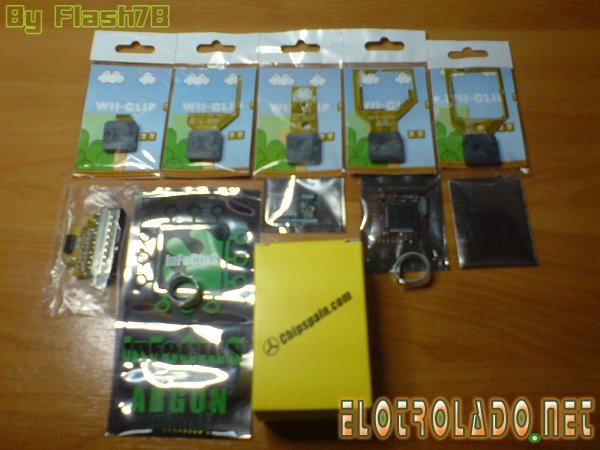
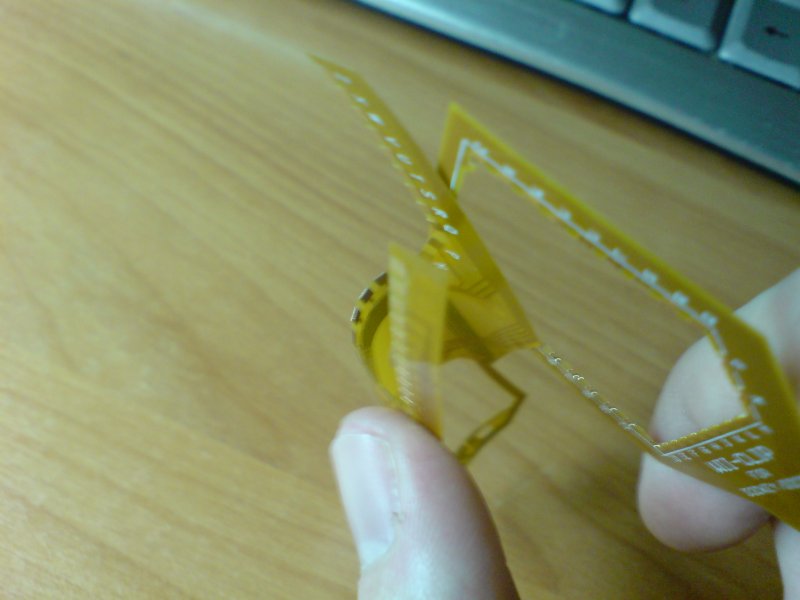
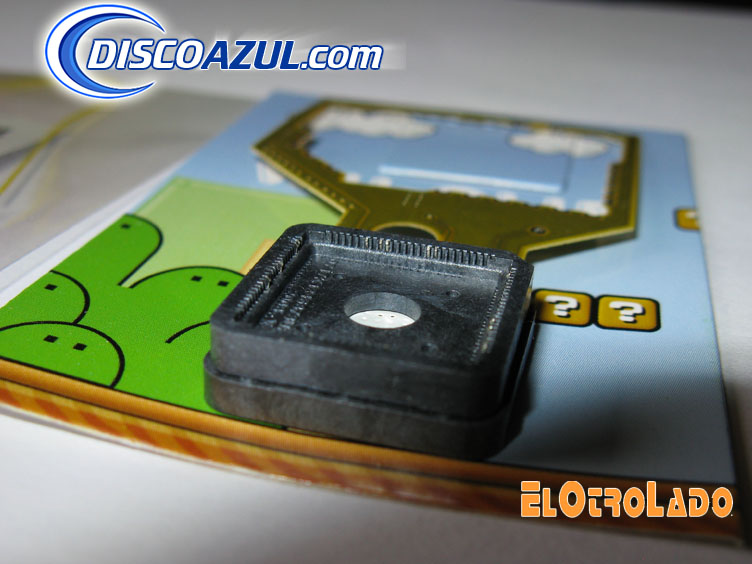
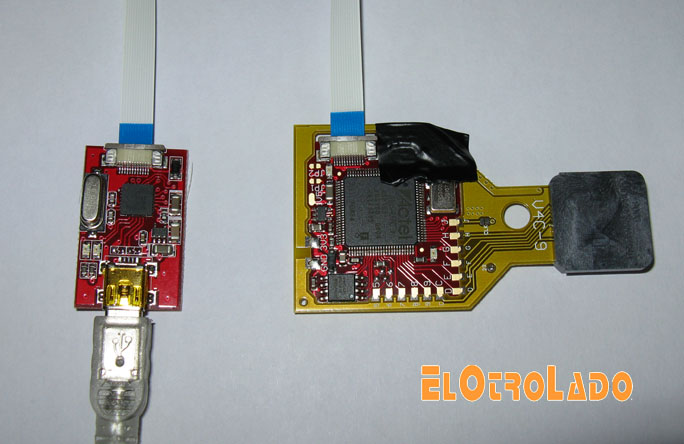
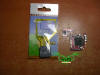
Aqui podreis ver el material recibido para la review:
Una vez abierto podreis apreciar el contenido sin bolsitas y con
todos los accesorios:
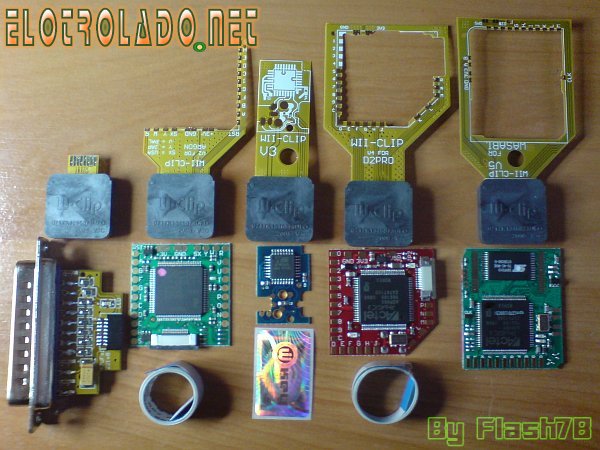
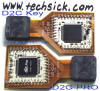
Ahora podreis ver los chips (D2cKey, Argon,D2Pro y Wasabi) para
controladoras D2C Soldados con sus respectivos Wii-Clips.
Estos chips tienen que soldarse al wii-clip, os dejo un video donde
podreis ver el proceso.
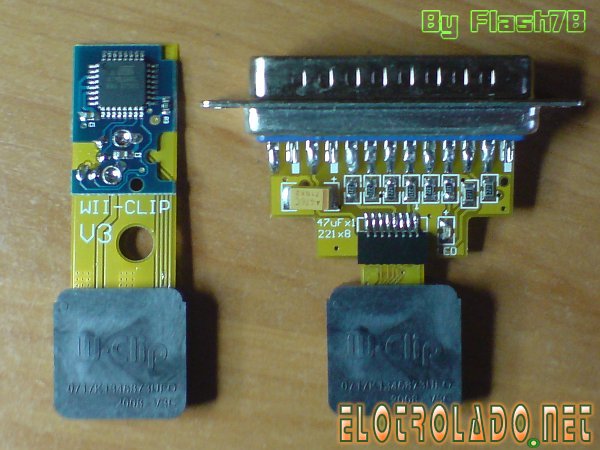
Como tambien hay wii-clip para controladora D2B podeis ver a
continuacion el Wii-Clip v3 y el Key Clip.
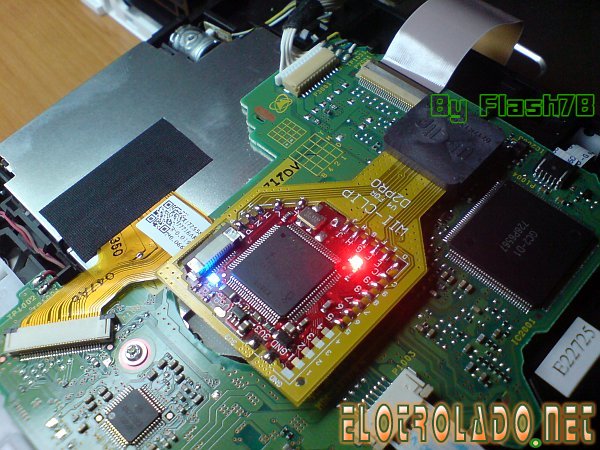
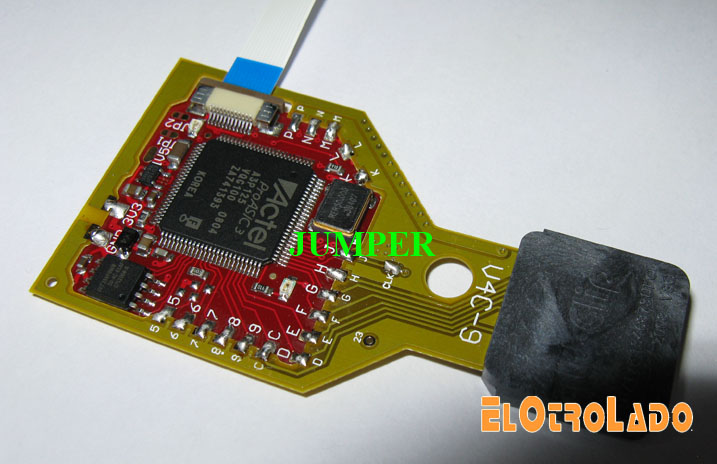
Wii-Clip V3 + Wiikey
La instalacion de un Wii-Clip es muy sencilla, solo hay que
colocarlo correctamente y apretar de manera uniforme el
wii-Clip.
Para poder ver mejor el proceso de instalacion he grabado un
video y foto :
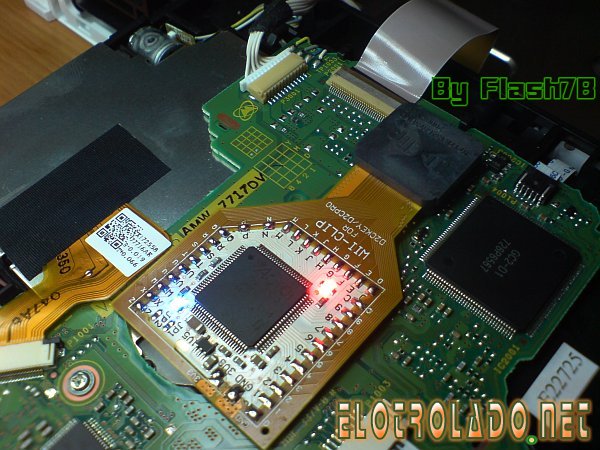
Key-Clip
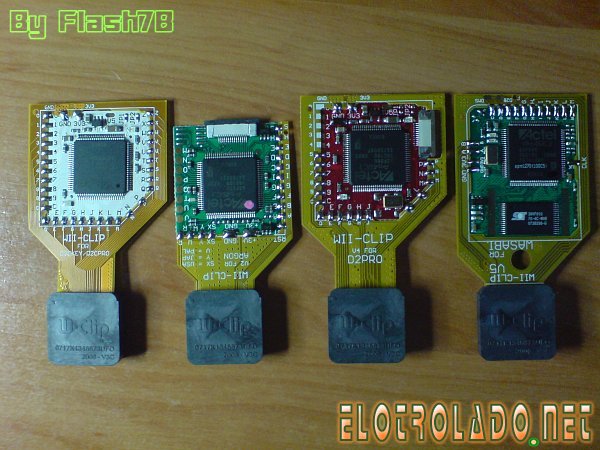
Wii-Clip V5 + Wasabi
En caso de tener una controladora D2B con patas cortadas ni
el key-clip ni Wii-Clip v3 son validos. En este caso podeis
usar el Wii-Clip V5 + Wasabi.
Al instalar el wasabi en una controladora D2C existen casos
con problemas de funcionamiento provocando que no arranque
el lector por un fallo en el sincronismo del punto clk. Esto
se puede comprobar al ver que el wasabi siempre tiene la luz
roja encendida.
Al efectuar las pruebas pude iniciar el chip tocando el
punto K con algo metalico solo entonces inciaba
correctamente. Al final del video podreis ver como se queda
la luz roja.
Este problema se puede solucionar al menos en las maquinas
que he probado alargando el cable Clk, a continuacion
podreis ver el resultado. Existe otro fix usando un
condensador pero no he necesitado usarlo.
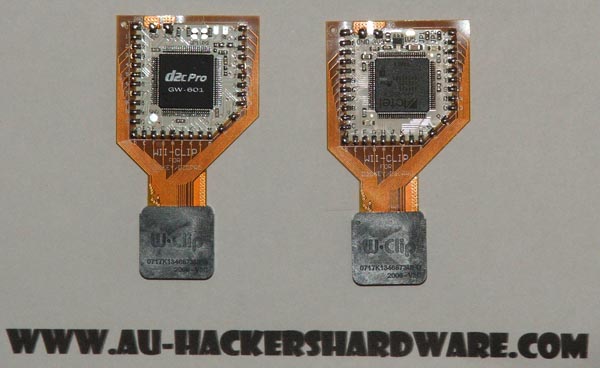
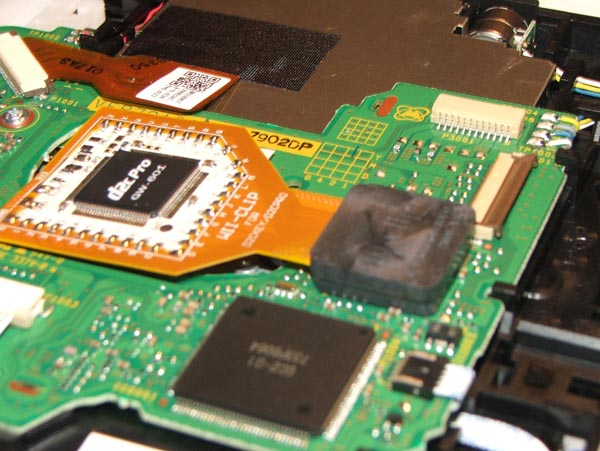
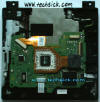
Wii-Clip V4 + D2Pro
Ahora os enseño el Wii-Clip V4 creado para el chip D2Pro, a
quienes quieran un chip actualizable es una opcion a tener
en cuenta.
En caso de querer activar el region free hace falta soldar
unos cables al lector o parchear los backups antes de
grabarlo. Este chip es actualizable pero necesita un
programador no incluido.
Podreis ver un video del funcionamiento y una foto para
apreciar los detalles.
Wii-Clip V2 + Argon
Una alternativa muy similar al D2Pro es el Argon del team
Infectus el cual se instala con el Wii-Clip V2.
En caso de querer activar el region free hace falta soldar
unos cables al lector o parchear los backups antes de
grabarlo. Este chip es actualizable pero necesita un
programador no incluido.
Wii-Clip V1 + D2Ckey
Aunque para el Wii-Clip V1 ya hice una review he vuelto a
probarlo, su principal ventaja es poder activar el region
free sin soldar ni un solo cable extra al lector. Para mas
informacion sobre el Wii-Clip V1 podeis mirar su
review.
Problemas detectados
Wii-Clip V1: Ninguno
Wii-Clip V2: Ninguno
Wii-Clip V3: Ninguno
Wii-Clip V4: Ninguno
Wii-Clip V5: Es obligatorio soldar el punto F pudiendo haber
aprovechado un punto de la controladora. A causa de un
problema con el Wasabi en algunos casos hay que poner un
cable para alargar la pista del punto clk o poner un
condensador entre el punto K y masa.
Mas informacion
Key-Clip: El conector del key-Clip no hace buen contacto con
el programador.
¿Como saber que chip se puede instalar?
Los diferentes chips de wii pueden instalarse segun la
controladora del lector, pueden ser mas complicados de
instalar o no ser compatibles. La unica forma segura al 100%
es abrir la consola y mirar la serigrafia de la controladora
del lector de la Wii.
Por estadistica en las Wii PAL si el numero de serie es
mayor de LEH1356xxxxx la controladora es una D2C.
Mas informacion.
Elige tu Wii-Clip y chip segun tus necesidades
Si no teneis claro que wii-clip instalar esto quizas os
ayude a decidir desde el punto de vista practico y mas
economico.
- Para controladoras DMS, D2A y D2B sin patas cortadas:
Key-Clip
- Para controladoras D2B con patas cortadas: Wii-Clip
V5 + Wasabi
- Para controladoras D2C con region Free: Wii-Clip V1
+ D2cKey
- Para controladoras D2C con chip actualizable por Usb:
Wii-Clip V2 + Argon / Wiiclip V4 + D2Pro (Programador no
incluido).
- Para controladoras D2C con chip actualizable por
DVD: Wii-Clip V5 + Wasabi (a veces da problemas)
|
--------------------------------------------------------
Review by: superdome44
(French review link)
Wii-CLIP Test: Installation, Stability, Fixing, Thermal
Impact…
Test of the Wii-CLIP to answer all questions on these products
1000 excuses pour la qualité de mon anglais. C’est un test en
français traduit rapidement.
Synopsis :
- Introduction
-
Installation: it’s plug and play ?:
-
Crash test (mechanical stability): Is that well fixed??
-
Thermal test (Burn): the WII-CLIP modifies it the correct operation of the
WII and reduced it its lifetime?
- Conclusion
Introduction:
As much, the WII became the console of the family, but with two children who
like all Mario, a woman who makes WII-FIT and I which is fan of Mario-Kart, the
DVD of games are damaged.
My son (4years) already botched WII-PLAY while slipping above…. (Outch it is that WII-play). Then like the DVD-VIDEO, it was
time to make backup. I studied the solutions and the WII-CLIP did not seem to me
badly! But there are a war between the “pro-solder” and the partisans of the “solderless”
in all forum.
Being a former tester of PC, I am say that a small serious test would make it
possible much to have an idea but especially to bring data on the famous
WII-CLIP.
It thus left for a test ............ YES but I decided to carry my test on the behavior of the WII-CLIP and not on the assembly (as the
totality of the tests) because it is quite good this product but what does it give over
the duration? And in intensive use?? One thus will try to answer it.
The installation it’s plug&play?:
My WII is a WII GC2-D2C SN LEH136744xxx bought December
2007, used in average 20 hours per week.
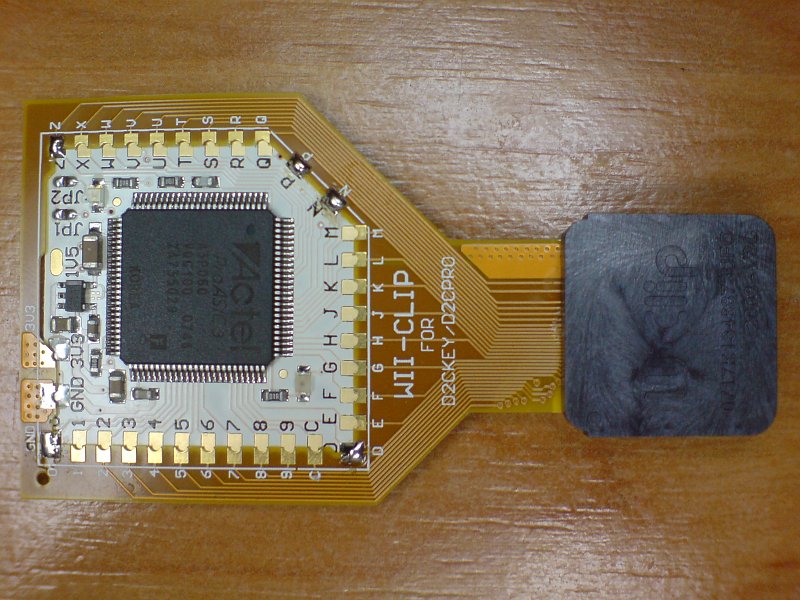
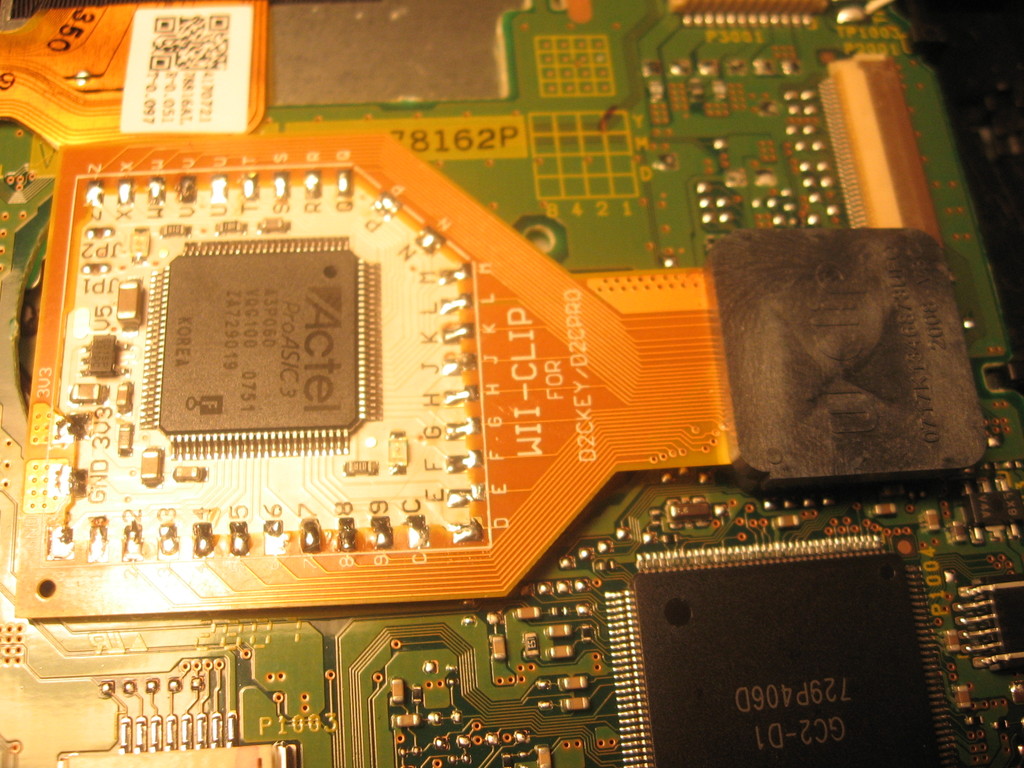
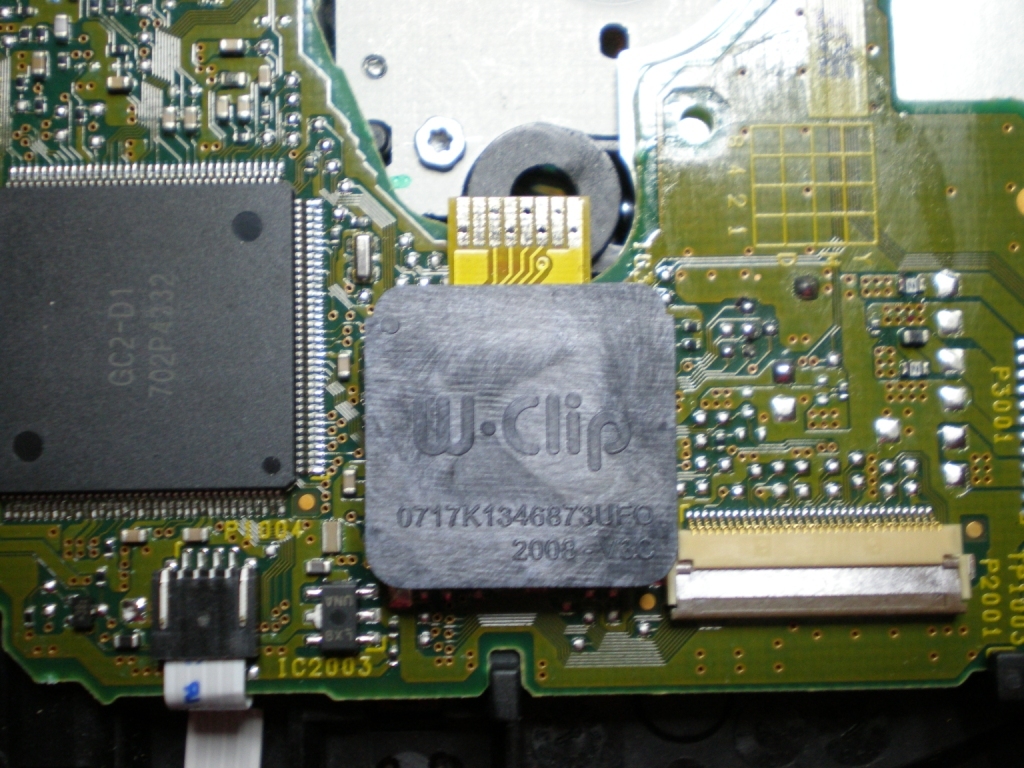
The WII-CLIP V1 FOR D2CKEY (0717K1346873UFO-2008-V3C) associated a D2CKEY
(A3P060 VQG100 ZA811023 0813 X212.)

I particularly will pay attention to the heating of the WII to identify if the Wii-CLIP modify this.
I modified a thermal captor TX2 (on the
left on the picture.)
It is a captor wireless I installa M-FK 1020
(Tolerance class A - 30 °C to + 350 °C).
I will make in short for the install:
- to solder the chip on the Wii-CLIP. Very simply!
- A small sticker on the lower part of the chip for the insulation…
- Disassembling the WII: it is a first for me but not problem there is good
Tutorial (Thank you XAVBOX).
- Installation of the WII-CLIP: you installations and you supports gently with
the inches so that the Wii-CLIP is inserted until
touching the chart. (note: I did not force and I did not hear a `Clip'!)
(I replace my thermal captor, under the cable of the Wii-CLIP,
I speak again about it further.)

- A small paperboard (style mario bros) which is posed
on the whole for the insulation.
- I go up the WII
- I test an game: OK (Ouffff)
- I test a backup of the original: YYESS !
Assessment of the installation: it is really very simply, promises held
for the moment! In fact, longest is to make its backups

Test of resistance (mechanical stability): Is that well fixed??
One of the questions about the WII-CLIP it is: does that hold well? Honestly,
once posed and the screwed up DVDreader, I do not
believe how that that will move
But let us make the things goods and go
until the end.
I had thus decided to take my WII in a bag and make a few
Kilometers
of VTT with! After a few hours of plays, history which the components still hot
and is dilated.
But my kid in decided differently! It made fall my WII by getting foot in Sensor
Bar cable! In a game of Mario-Kart (therefore I am not in TOP 10).
After a big fright and a fall of more one meter (my console being on a HP beside
the TV, to see photo further). No breakage for my son (you don’t care about
yourselves some, I know!) ...... but the WII is damaged !
There, I said myself: “the WII is died”, end of the test!

I replug (and organize this cable of the sensorbar)… normal noise… home page … OUFFFFF
…. Test original games and channels
OK
Always also strong the Nintendo hardware
Finaly, it’s the best crash-test for the WII-CLIP?
Test of a backup: OK
Bilan : a fall of a WII 1 meter on tiling whereas it
is under operation, that must be the worst than one can imagine for his WII! and
even in this case, the WII-CLIP did not move and the whole always functions very
well. The hull is fissured but it is a less evil.
Thermal test: the WII-CLIP it modifies the correct operation of the WII
and reduces it its lifetime?
The WII-CLIP locks up chip D2C, the chip must thus heat of advantage! On the
basis of this logic the following question is: the WII-CLIP T it modifies the
correct operation of the WII and reduces T it its lifespan?
Here thus the test that I set up and that I will continue until the end of
August.
-10 days of plays and connect24 without WII-CLIP with statements of the
temperatures
-10 days of plays and connect24 with WII-CLIP with statements of the
temperatures
- Publication of the first results
- Continuation of the statements during the summer with final assessment at the
end of August.
I will have liked to record the temperatures directly on chip D2C but the captor
which I have and too big so that I can leave it once the WII-CLIP in place.
I took the captor under the Wii-CLIP cable (Zone not
swept by the flow of air once the WII-CLIP set up). If the WII-CLIP heats, this
zone will be the good point of reference, especially in connect24 or there is no
circulation of air.

The interest of my installation it is that it keeps in memory the highest and
low temperatures, with external and inside the WII.
A simple catch of note after each meeting of plays and each period of
wii-connect24 thus gave me the following figures:

In graph:
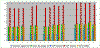
The result speak, they does not have there practically no thermal modification
after installation of the Wii-CLIP. The days posted in
red are days or the ambient temperature was identical and the figures are very
close +1°.
It should be noted that beautiful the days returned what explains the increase
in the temperatures in >J+6 but the internal increase the same progression
follows proportionally to the external temperature.
Being very surprised of these result, I search more information on the D2x CHIP.
In fact, this CHIP manages interface I/O between the DVD and the WII
(approximately), it is all!.
What I checked while letting turn of the videos of intro of DVD of backup, here
the internal temperature increases more than at the time of the play because the
DVD is reached in a constant way during a few minutes. But that amounts in a few
degrees.
No the risk thus of dilation of chip, cast iron of the Wii-CLIP…
this components does not need really active cooling. A controller of reader of
CD/DVD there is everywhere of them PC, DVD reader, Notebook PC or that sometimes
heating without unspecified cooling!
Me which am in the field of data processing, I seldom see readers HS! Except
sometimes mechanics (engine or lenses) but it is after intensive uses.
Conclusion:
In conclusion, following these tests one will try to answer the various
questions about the Wii-CLIP:
Installation it’s plug&play ?: YES it is simple
and fast! BUT one should not be a Ogre! Here one handles gently and
precisely components thus quiet… and warning, there are nevertheless some weldings to make chip on the clip. To thus privilege the
experiment of a friend if you are not very a handyman!
Is that well fixed?? YES according to
my experiment that holds very well once in place, but it is this installation
which must be precise, the Wii-CLIP it is not made to
be removed and given several times!
The WII-CLIP it modifies the correct operation of the WII and reduces it its
lifetime? NOT with short and medium term. It is an answer which could not be
checked on the long term but one has reasons to be optimistic considering the
weak one impacts thermal Wii-CLIP.
Then do the WII-CLIP I sink? YES and NOT, the concept holds its promises
but the problem is beyond all these questions… it is necessary to look behind
marketing…
The WII-CLIP targets the initial users and it is there that begins the problems
because it is necessary to choose between some 12 versions of WII-CLIP which go
on 5 versions of different WII with ten different chips!!!! And here I
summarized 95% of the problems which one finds on the forums with these
WII-CLIP: incompatibilities …
I advise you two things if the WII-CLIP interests you:
- you must Inform of wii version! and on the versions
of chips and WII-CLIP compatible? a unofficial table French help to chose HERE RECAP of the Wii-CLIPs
- Not to buy a version of the too recent WII-CLIP! Let pass a little time to see
the first tests leaving and thus knowing the possible problems with certain
chips or WII.
More test and list :
http://gueux-forum.net/index.php?showtopic=186345
Liens:
Site officiel : SITE WII-CLIP
Mon Test sur :
Installation, Stabilité, Fixation, Impact Thermique, Test du wii-clip afin de
répondre aux questions annexes sur ces produits
Afin de trouver rapidement sa version voici
les tableaux récapitulatifs des versions.
Tableau décomposé en 3 et retravaillé le 24/05


Afin d'être complet, vous pouvez réporter vos expériences sur ce post en
indiquant:
-le SN de la WII
-la version du D2x
-la version exacte du wii-clip car maintenant il y a des version B C....
-la version de la puce utilisé....
Ex pour moi :
- WII SN LEH136744xxx
- GC2-D2C
- Wii-CLIP V1A
- D2CKEY V3C
- Test OK

|
--------------------------------------------------------
Review by OverfiendX :
|
Hello
Folks,
OverfiendX here with the UPMS/IC2005 review of the Wii-Clip. I
would first like to thank the team behind the Wii-Clip and IC2005 for
choosing UPMS-Project and myself to review this great product.
The Wii-Clip installing video:
I received my Wii for Christmas 2007. This was a gift to me, but
I think the wife and kids had ulterior motives for this gift. They play
it more than I do, as with any other console I own. The first thing I
had to know was how to mod it. I began my search for information and
soon came to realize I had the infamous D2C chipset. I was happy to
discover that a modchip did indeed exist for this model. Unfortunately
it would require a 32 wire install on a chip smaller than anything I
have ever soldered on before. I was very disappointed and a little timid
about attempting this install. Fortunately I found a flex PCB that was
supposed to make this beast of an install rather easy, or so it seemed.
My D2CKey
and flex PCB arrived some weeks later. I had arranged for someone with
more experience on electronics of this size to attempt the install. Well
let’s just say my Wii and D2cKey survived the ordeal, but the same could
not be said for the flex PCB. Now back to square one and no longer
having a PCB, I was faced with having to do a wickedly difficult wired
install. Something I in no way was looking forward to, but after the
last attempt I was unwilling to trust anyone else with this mod.
Just about
this time a fellow UPMS member Hackmimic sent me an email about a very
intriguing product. He said he did not have time to look into it, but
thought I would be interested in it. This turned out to be a link to
IC2005 and the Wii-Clip. I was completely floored to see what The Wii-Clip
Team and IC2005 were offering the Wii scene, a flex PCB with a chip clip
at the Wii end.
It seemed my prayers were answered, upon further investigation I
learned IC2005 wished to have this product reviewed. I immediately sent
my information for consideration. I waited anxiously for a reply. I was
very pleased that within hours I received word from IC2005 that my
review kit would be sent out ASAP. I was as giddy as a school girl when
I received this reply. I received my kit in less than 2 weeks which is
great considering they said they would not be sending it for one week.
Upon receiving and opening my kit I was completely surprised to find
they had not only sent the promised Wii-Clip, but they had sent two of
them. All I can say is WOW, what a great company IC2005 is. They make
sure you have what you need to do the job and then some.
I would
like to state the quality of this product is well above average. All
solder points are gold plated, and the clip itself is very well
constructed.
  
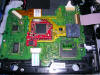
The first
step to this mod is the disassembly of the Wii console. This task is
made easy with a tri-wing screwdriver. Nintendo loves to use these
tri-wing fasteners on all their products. All said disassembly took
about 6 minutes.
  
The next
task is to solder the Wii-Clip to the modchip. Again with the excellent
quality of construction, the Wii-Clip is very easy to line up on the
modchip. Once lined up the actual soldering goes relatively quick.
The best
way to start is to choose a solder pad on the modchip and lay down some
solder on it. Line your Wii-Clip up with all the corresponding points on
the modchip. Now using this pre-selected pad spot solder the Wii-Clip in
place. Using an adjacent pad solder the other side of the Wii-Clip to
the modchip. Now just solder all remaining point to point locations. If
using the D2Ckey be sure to close the correct jumper for region free
compatibility. I am far from being professionally experienced at
soldering, but even I was able to finish this step in 5 minutes.
   
Now with
the soldering complete it came time to install the Wii-Clip on the Wii
drive chip. With firm but even pressure I pushed the Wii-Clip into
place. Making certain it was completely seated. I would add the fit of
the Wii-Clip on the chip is as if Nintendo themselves designed it. I was
a little worried that the fit would be sloppy and not tight, but it
literally snapped into place over the chip. This left the connection
extremely tight and secure. I even tested this by trying to remove the
Wii-Clip. I actually had to pry it off the chip to remove it. After this
I was in no way worried of it popping off inadvertently. With the Wii-Clipped
D2CKey in place I covered the solder connections with the provided
product label/protective cover to prevent any short circuit
possibilities.
   
Next is to
re-assemble the Wii and run the final usage test. With assembly complete
I turn on the Wii and notice no ill effect of having the mod in place. I
first tested an original Wii Sports disc. I was pleased to see the game
appear in the game channel. Upon pressing A the game launched and played
just as it should. Now was time for the ultimate test, a backed up game
disc. I proceeded to load my backed up copy of EA Playground, and just
as if it was the original it loaded and played without a flaw.
I have to say it was a real treat reviewing this truly awesome
product. From its quality construction to the ease of installation this
thing screams perfection. I really can’t say enough how every Wii owner
needs to get one of these Wii-Clips. One of the best features is the
ability to remove this mod with no ill effects on the Wii drive. Even
better is that it can be installed on any Wii with the same chipset.
Just simply pop it off the old drive and back on the new drive.
With that
being said I give this product a perfect
10.
Thanks to
the Wii-Clip Team and IC2005 every Wii owner can rejoice knowing that
even if they have limited soldering experience they can complete this
mod with relative ease. So what are you waiting for go to IC2005.com and
order your WII-Clip right now. You will be glad you did.
Well until
next time never bend to limits, mod everything. Most importantly be
safe.
OverfiendX
UPMS-Project
|
--------------------------------------------------------
Review by Flash78 :
http://www.elotrolado.net/hilo_-Review--Wii-Clip_981047
[Review] Wii-Clip
Gracias a los creadores del Wii-Clip,
nuestro patrocinador Chipspain.com y a jixo he recibido unas muestras
del Wii-Clip para poder realizar esta review.
Hoy me han llegado 2 muestras directamente del equipo del Wii-Clip,
mañana o pasado me llegará la muestra de nuestro patrocinador
chipspain.com en la cual instalaré el Infectus 2.
características Destacadas:
Existen varios modelos, el primero y que he recibido esta pensado
para instalar el D2ckey y D2CPro aunque puede usarse para soldar
otros chips como el infectus y D2Pro, entre sus caracteristicas
destacan:
- No requiere realizar ninguna soldadura en el lector.
- No hace falta usar cable, lupa y no necesita que el soldador
sea de punta fina.
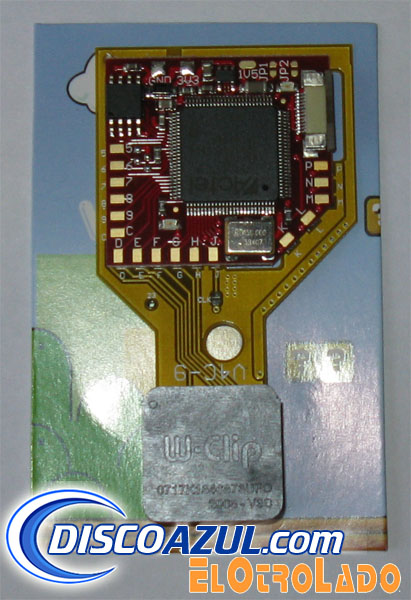
- Permite instalar por ejemplo el D2CKey mas rapido y sencillo
que el wasabi.
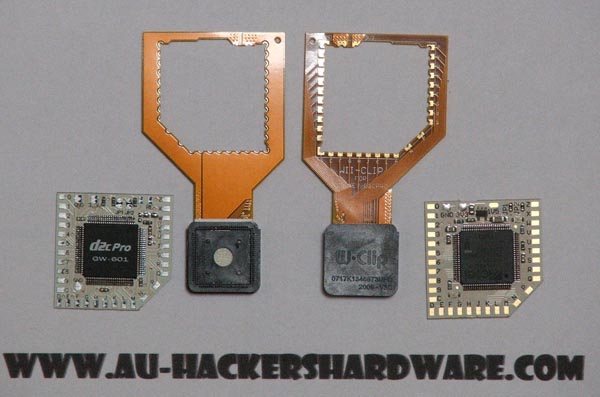
Wii-Clip y Otros productos similadres
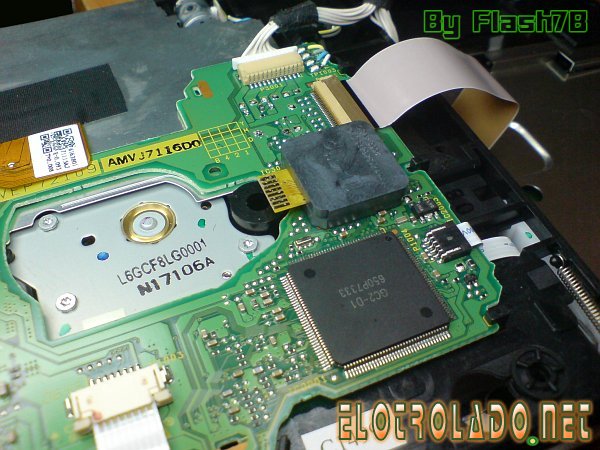
Aqui podeis ver las 2 muestras que me han llegado, en una instalaré
el d2ckey y en la otra el D2Pro (No el d2cpro).
Una vez abierto el acabado y diseño es correcto y sin nada que
reprochar.
En la siguiente foto lo podreis ver con otros sistemas similares. El
flexpcb personalmente no he tenido buenos resultados y prefiero
realizar las instalaciones con cable.
El Wlip, personalmente no tuve problema alguno aunque algunas
personas reportaron problemas al llegar con las patas dobladas.
En este zoom se puede comparar el sistema usado para realizar
contacto con las patas de la controladora. Mientras el encapsulado
en el Wii-Clip es de un plastico duro, el material usado en el wlip
es un poco flexible.
En la foto siguiente puede verse el aspecto final del Wii-Clip y
Wlip listos para conectarlos al su respectivo lector.
Por si teneis dudas sobre el material flex usado, este es un poco
mas grueso y resistente que el flexpcb. A la hora de soldar no he
tenido problema alguno.
Instalacion
En la bolsa del Wii-Clip viene una pegatima para proteger la parte
inferior del chip de algun posible cortocircuito. No tiene misterio
alguno pero lo podreis ver en las siguientes fotos.
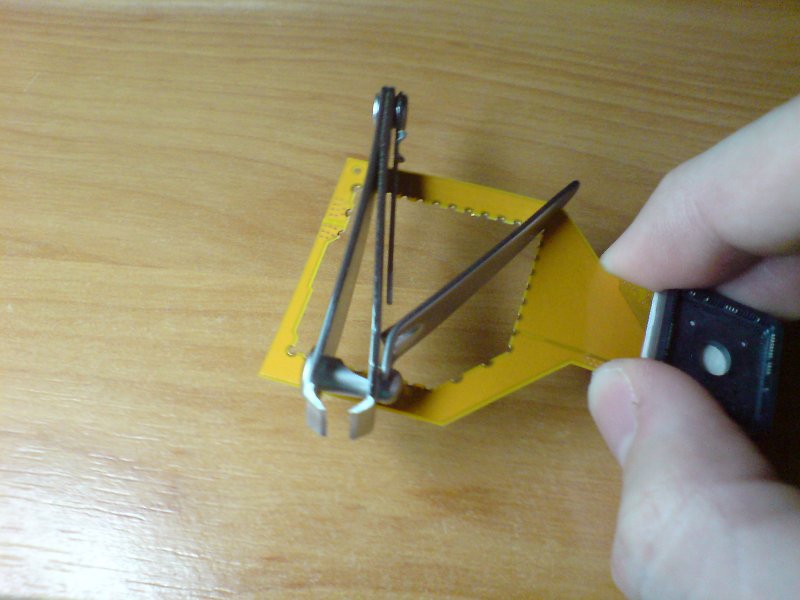
Ahora hay que aliniar el chip para que coincidan las patas y sea mas
facil soldar. Recomiendo empezar a soldar por el punto 0, luego el N
y finalmente las otras esquinas para que quede el flex lo mas pegado
al D2ckey.
La parte facil viene ahora para soldar el resto de cables y juntar
los jumpers necesarios para activar el region free.
El siguiente paso es el mas importante y rapido de hacer. Colocar el
Wii-Clip en la controladora D2C. En el caso que previamente en el
lector se haya intentado instalar un chip directamente en la
controladora podria requerirse malla desoldadora y flux para quitar
el estaño sobrante y una vez acabado con cuidado limpiar las patas
con un baston de los oidos mojado en alcohol.
A la hora de colocarlo una vez esta encajado apretar de manera
uniforme y sin miedo para que quede bien sujeto. Una vez ha encajado
podeis eschuchar un ruido. A continuacion dejo un video para que
veais el proceso.
( This is video link in youtube:
http://www.youtube.com/watch?v=r2kwJi_Yecc )
Antes de comprobarlo podeis mirar que por todos lados este igual, si
hay algun lado un poco levantado podeis apretar y con el tester
comprobar que entre diferentes puntos no existen algun puente.
Si todo es correcto antes de cerrar hay que coger la cartulina con
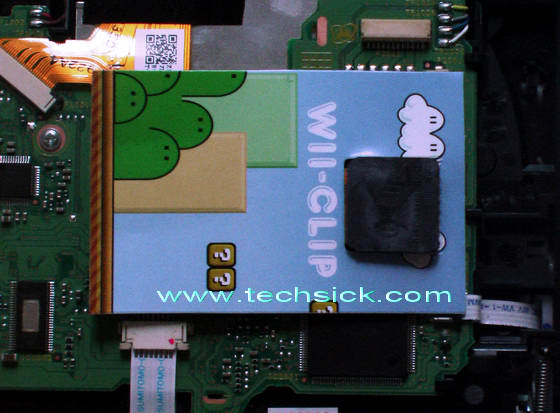
el dibujo del SMB y cortar el trozo de enmedio para proteger las
soldaduras del chip de posibles cortocircuitos.
Funcionamiento
Al principio por ir con cuidado y con la experiencia del wlip no
apretaba con mucha fuerza, en este caso es diferente y hay que
apretar mas fuerte al estar mas ajustado y ser completamente rigido.
Una vez encajado he repasado por todos los lados que esta
completamente que no hay algun lado levantado. Fialmente el chip ha
funcionado sin problemas.
Aunque este modelo no esta pensado para el D2Pro perfectamente puede
instalarse, tras soldar primeros los cables al Wii-Clip luego he
puesto encima el D2pro y soldado los cables segun la
equivalencia. Para disponer del region free se tendrian que
soldar unos cables a parte.
(Notice: when use D2PRO on the WII-CLIP V4 is not need any wires,
just like the D2CKEY/D2CPRO on WII-CLIP V1, here is for review
testing only.)
Opinion Personal
Antes de instalarlo pensaba que tendria que volver a quitarlo y
poner y tenia miedo de que se doblaran las patas.
A la primera ha funcionado a las mil maravillas un d2ckey que tenia
guardado por pereza de soldar los 31 cables. He quitado el chip, mas
tarde vuelto a poner como se ve en el video y aun con solo una mano
tampoco ha dado problemas.
Con el otro Wii-Clip al que he instalado el d2pro tampoco me ha dado
problemas aunque ha sido mas entretenida la instalacion, si no hay
prisa y prefieres una instalacion limpia esperaria la version
especifica para el chip que quieras. Si quieres el chip pues depende
del caso será recomentadado o no. Personalmente para instalar el
wasabi esta version no merece la pena.
|
--------------------------------------------------------
Review by overthenet :
http://gueux-forum.net/index.php?showtopic=183732
Bonjour à tous
Il y a quelques jour est sorti le wii-clip ,un mix entre wlip et FlexPCB.
Je sais qu'un modchip sans soudure ne vaudrait jamais une Wiikey ou une
D2CKey , mais au niveau du portefeuille non plus .

Si quelqu'un à déja testé , vos avis etc......
J'ai eu quelques Echo qui disait que c'était facile à installer mais que
des fois falait lancer 2 , 3 fois son backup pour qu'il marche

Le site offre des wii-clip pour faire tester des sites de modship et
autres forums pour info.

CITATION
*Supporte tous les chipset D2C et D1A, efficacité
assurée, le travail est fini en 2 minutes.
*Très facile à installer, il suffit de souder les gros points au Wii
Clip, puis de le placer sur le chipset, pose et joue.
*Très facile à retirer, il n'y a qu'à de soulever le Wii Clip de la
carte mère, inutile de dessouder quelque chose. Cette manipulation
vous redonne immédiatement votre console d'origine.
*Très aisé de remplacer la puce, il faut simplement relever le Wii
Clip, retirer l'ancienne puce, souder la nouvelle et replacer le Wii
Clip sur le chipset, l'upgrade est faite.
A vos Clavier

--------------------------------------------------------
Review by untitled :
http://gueux-forum.net/index.php?showtopic=183732&st=0&gopid=1282580&#entry1282580
Salut tout le monde,
J'ai acheté et test le Wii-clip, et bien ca à l'air beaucoup mieux que
le wlip à première vu, hein ? Et ça l'est !
Assez simple à mettre en place et sans risque si vous n'êtes pas une
grosse brute.
J'ai fait un p'tit review pour www.wii-clip.com je vous le met si ca
vous intéresse (et oui, c'est en anglais...) :
Reasons to choose Wii-clip ?
I have already solder some chips on old generation game console, but I
never had in my live to solder on very small points like needed to sold
d2ckey for instance. Thus I didn't want to take the risk to destroy my
lovely Wii and purchase the Wii-Clip.
First Feelings :
Befor receiving the Wii-clip I was not convinced yet. Of course the
pictures showed a product which seemed to be much more effective than
any system without solder made before. But I feared it could blend /
broke the pins of the D2C chip.
Installation :
The solder step was quite easy the only difficulty was to solder the
first contact pads. The two difficulties (if we can call that
"difficulties"...) for this were, fisrt to align perfectly the chip with
the Wii-clip and to keep the Wii-clip plane (the flexible PCB was a
little bent). Everything is solved just with a bit of scotch tape to
keep the Wii-clip plane and align with the chip. For the final step,
like I said, I feared to broke my Wii, so I did not press to much the
clip on the D2C chipset (indeed not enough). I tryed to make the Wii
work but the d2ckey did not his job ! So I removed the clip (carefully !
You have to raise every corner before trying to remove the clip) and try
to press a bit more harder. It took my three times to have the courage
to press enough to make everything works but in the end the chip worked
perfectly.
Conclusion :
It works !
Doing everything carefully, step by step, no chance to break your Wii if
you are not brutal.
|
--------------------------------------------------------
Review by tom35 :
http://wiinewz.com/forums/d2ckey/66986-wii-clip-review-post520199.html#post520199

Wii-Clip Review
I have done a thorough review of the Wii-Clip and the product is
made very well and fits very well to the chip.
The PCB portion of the Wii-Clip is heavier than the Flex-PCB.
It took a little fidgeting to get the Wii-Clip to clip over the D2C
chip but once I had it set properly, I heard a little click and was
able to give slight tugs and the Clip held to the chip.
Pulling hard will definitely dislodge the clip from the chip, but
for everyday use, I do not see a problem where the clip would fall
off.
The PCB is designed in a way that it is not resting flush against
the DVD Drive.
There is room for airflow beneath the PCB for those concerned about
the airflow issue that has been raised in the forums.
I checked the contact points and they all were read fine by the
multimeter.
I did shake the Wii and Banged it a few times after the install and
when I opened the Wii again, the clip was still holding firm and
contact points still good with the multimeter.
I do not see much of an issue with traveling with the Wii unless
there is substantial jostleing about.
Heavy shaking and banging did make the clip come loose so I opened
my Wii again today and put a small layer of wrapped electrical tape
on top of the clip.
Now the Clip is being held securely against the metal plate
shielding the System Board.
For $29 US it was a good investment.
I did notice that the Wii-Clips have raised in price by $10 US and
are now $39 US.
I would still think that this would be a good investment.
Especially for the soldering challenged.
I will be getting another for the D2Pro.
My opinion is that most of the people bashing the Wii-Clip are
supporters or are in someway affiliated with the sales of the
Flex-PCB or they are making wild accusations on a product that they
themselves have not seen.
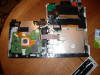
Below are the pics I took during my install.
Sorry the pics suck, I think my Fiance was messing
with the settings of my camera and I did not notice until after I
had the Wii back together for the second time
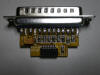
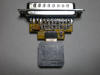
My Wii-Clip
 Wii-Clip and D2CKey
 D2CKey Soldered to Wii-Clip
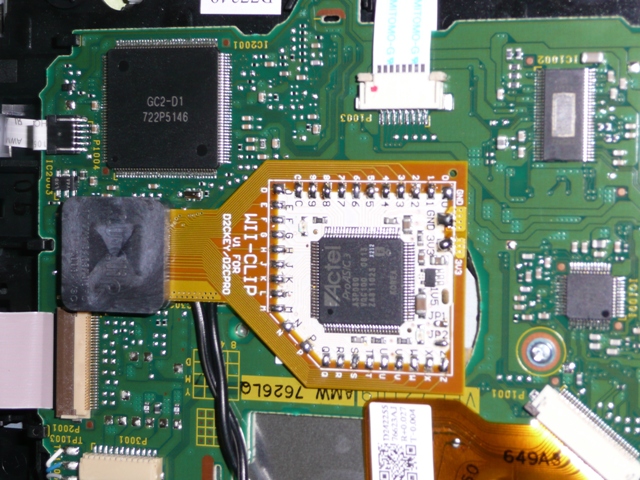
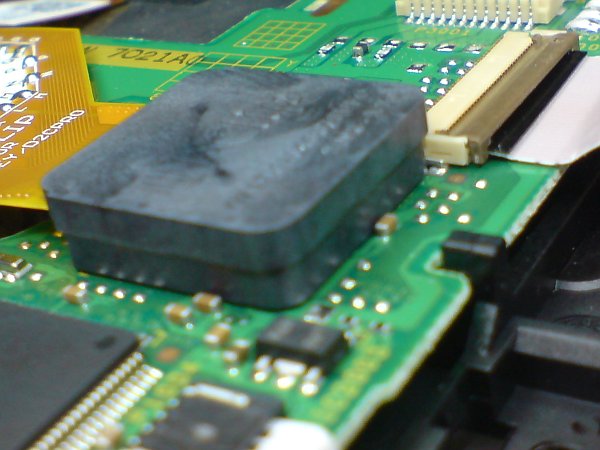
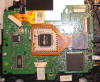
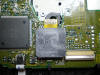
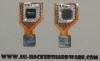 Wii-Clip and D2CKey Installed on the DVD Drives D2C Chip
 |
--------------------------------------------------------
Review by cpuwhiz22 :
http://wiinewz.com/forums/d2ckey/66951-upcoming-d2ckey-wii-clip-installation-review.html
D2CKey/Wii-Clip Review
First off, I would just like to give kudos to the WiiNewz team for
getting the best damn Wii community back online so fast. I am
saddened by the losses accrued, but it is good to see that WiiNewz
will continue to be the most active Wii modding resource on the web.
Next, I have just recieved my "Wii-Clip" ( www.wii-clip.com)
and D2CKey. I am experienced with non-D2C chip installs, but I have
chosen to avoid D2CKey installations due to the complexity of the
installation itself. Recently, an asian manufacturer has developed a
flex PCB adapter for the D2CKey (and now other versions of Wii mod
chips) to make installations of the D2CKey much easier. This will
allow users to take their time soldering the mod chip into the flex
PCB, without risking damage to their Wii drive. With this design,
nothing will need to be soldered into the drive itself. The chip
will be soldered into a convenient adapter which then will mount to
the D2C chip on the Wii drive. This also allows for clean removal
and upgrades of the mod chip.
I have just recieved the Wii-Clip and a new D2CKey and I will be
doing an installation tonight and a review from the perspective of
someone with experience installing modchips, but no experience
installing D2CKeys. Hopefully this will help all of us who are
looking to mod D2C Wiis, but not willing to risk a botched install,
and still weary of new flex PCB chip adapters. It will be up soon.
EDIT: Here is the review...
D2CKey/Wii-Clip Review
This review is written from the perspective of an experienced
non-D2C Wii mod chip installer with no prior D2C chip installation
experience. The D2CKey was purchased from
www.modchipcentral.com (Canada) and the Wii-Clip was purchased
from www.ic2005.com
(Hong Kong).
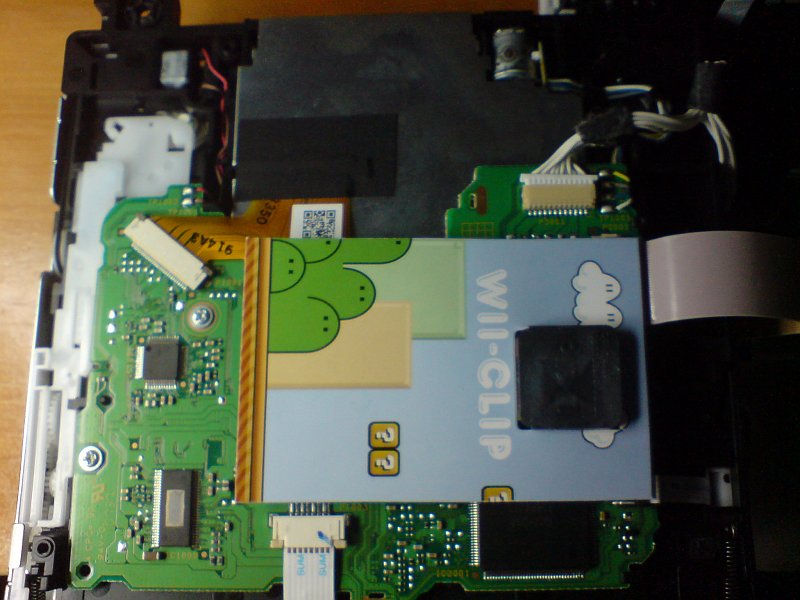
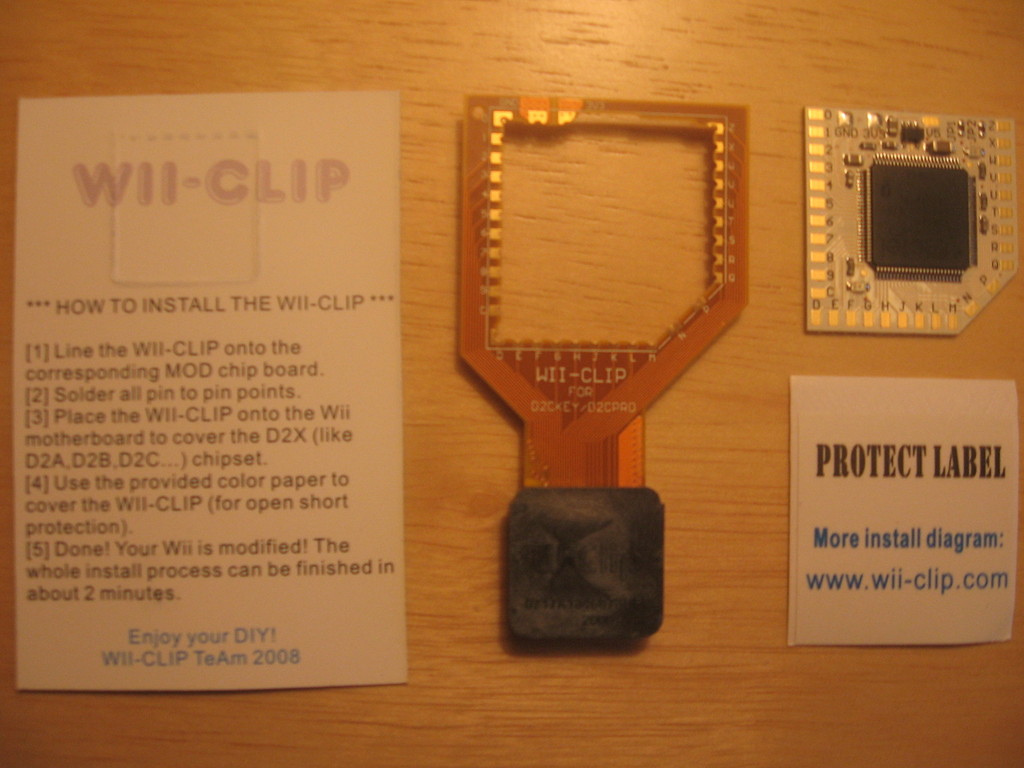
Package:
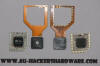
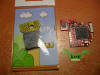
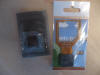 Contents:

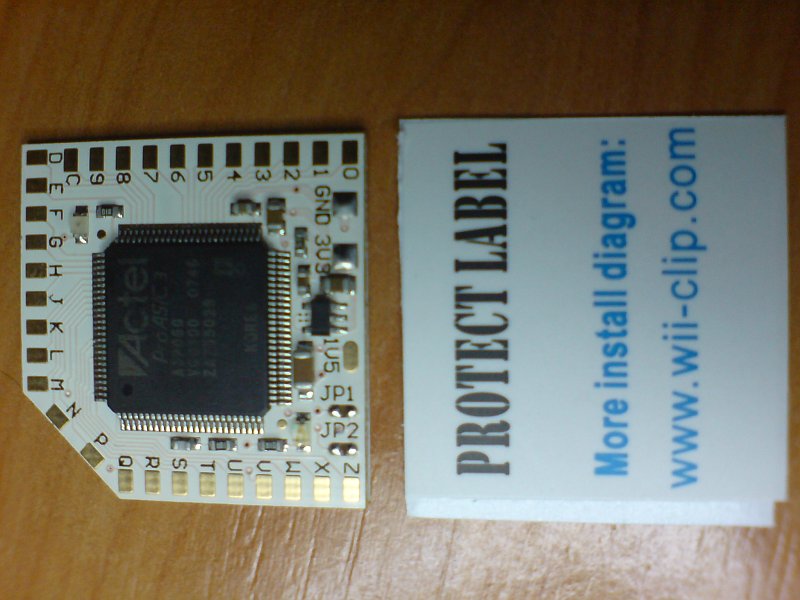
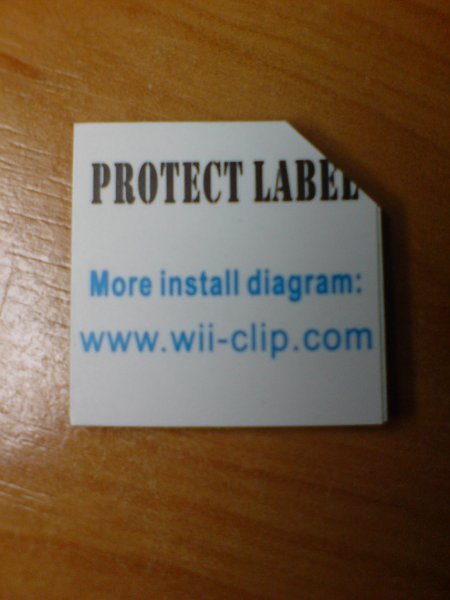
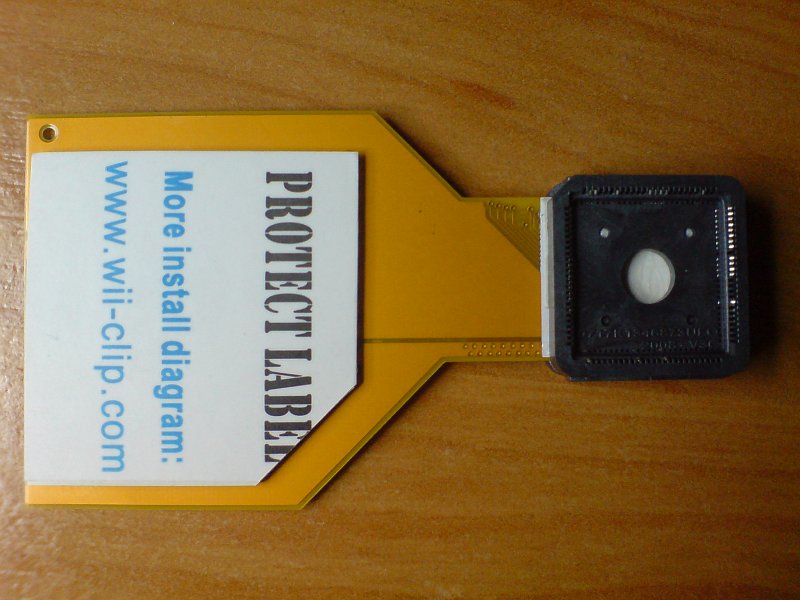
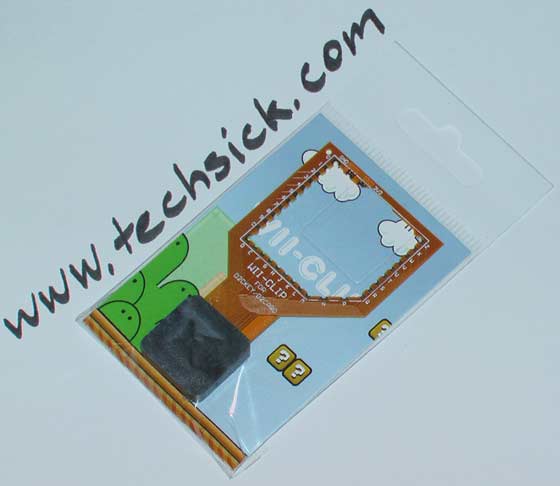
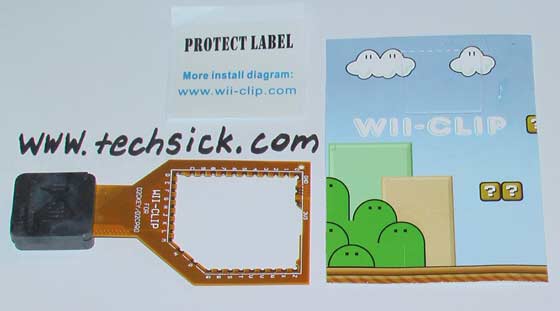
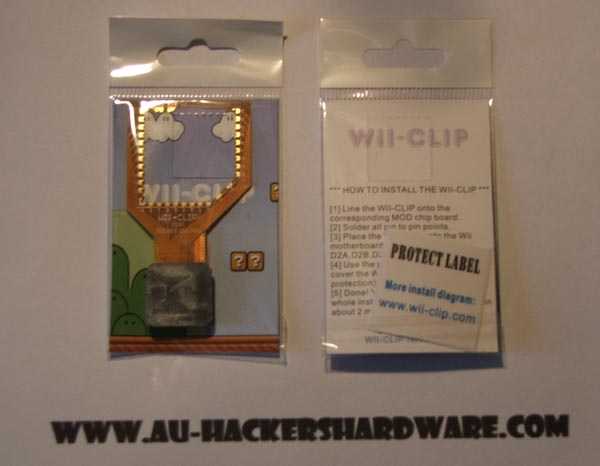
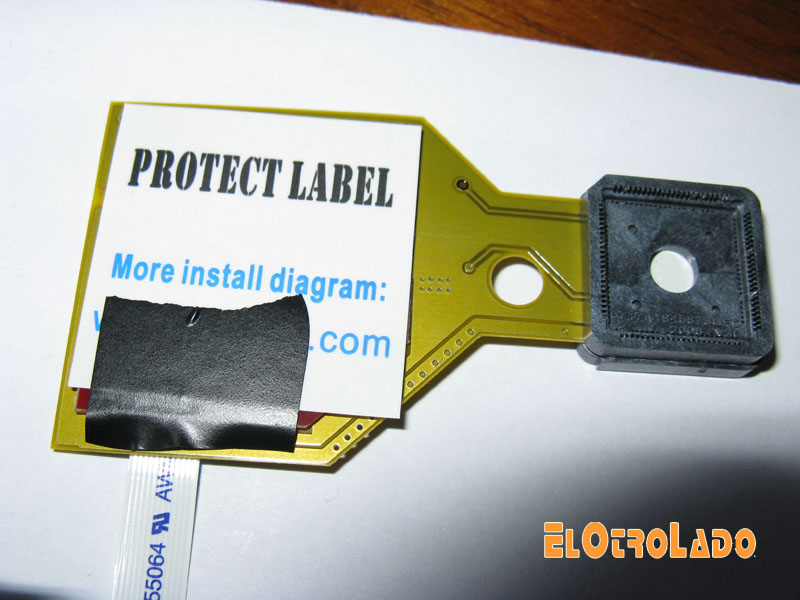
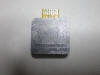
The Wii-Clip comes in a convenient packaging that includes the Wii-Clip
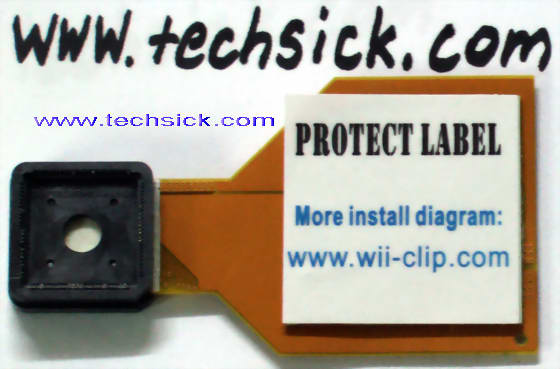
itself, a "Protect Label" (which is basically just an insulated
sticker to prevent shorts on the underside of the D2CKey), and
additionally a cardboard card that has instructions on one side and
a picture on the other side. The instruction card must not be thrown
away however, because it is later used as an insulator to prevent
open shorts on top of the Wii-Clip/D2CKey. The manufacturing of the
Wii-Clip is very high quality. This does not mean however that is is
not fragile, but it means that the tooling is precise, the design is
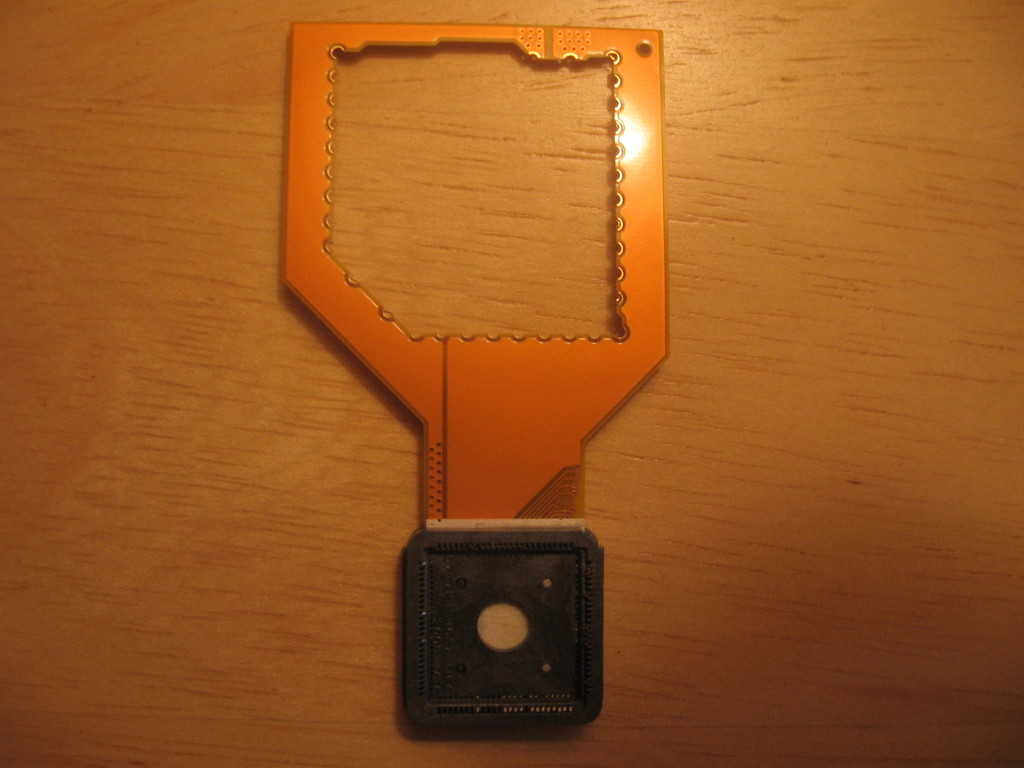
good, and the materials are good. Here is a picture of the underside
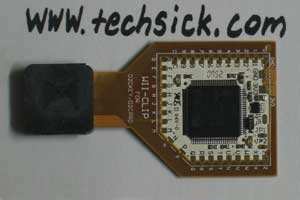
of the Wii-Clip:
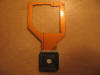
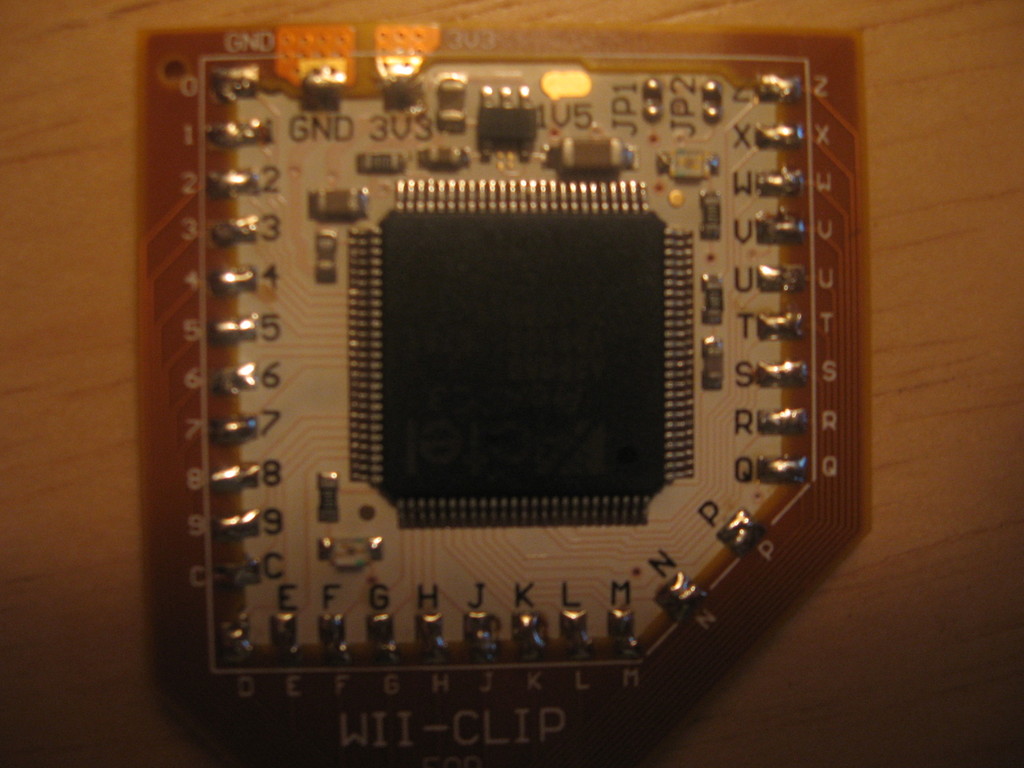
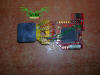
As you can see the conductors on the underside of the Wii-Clip are
very precise, and separate to prevent any shorts. The installation
of the D2CKey into the Wii-Clip was extremely fast and easy, with
the hardest part being the alignment of the D2CKey in the Wii-Clip.
Once the first connection was soldered, the rest of the installation
was done in minutes. The tricky part about lining the D2CKey up with
the Wii-Clip was that there are 28 connections that all need to be
aligned. Sometimes when you get one area lined up, then another area
will need to be adjusted or re-aligned.
Additionally, when the mod chip is sitting flat on the table, and
the Wii-Clip is also sitting flat on the table (aligned with the mod
chip) you have a small vertical gap between the PCB and the mod
chip. This makes it somewhat difficult to align the two pieces
because you have to first hold the two together to eliminate the
vertical gap, and then align the connection points laterally. This
is somewhat tedious to get the first point soldered, but after that
the alignment is constant laterally, but you will still need to hold
the two pieces together in some places where there is a vertical
gap. I imagine this could be solved by using helping hands/clips,
but I did not want to risk damage to the PCB. Here are pictures of
the top and bottom of the chip after installation in the Wii-Clip.

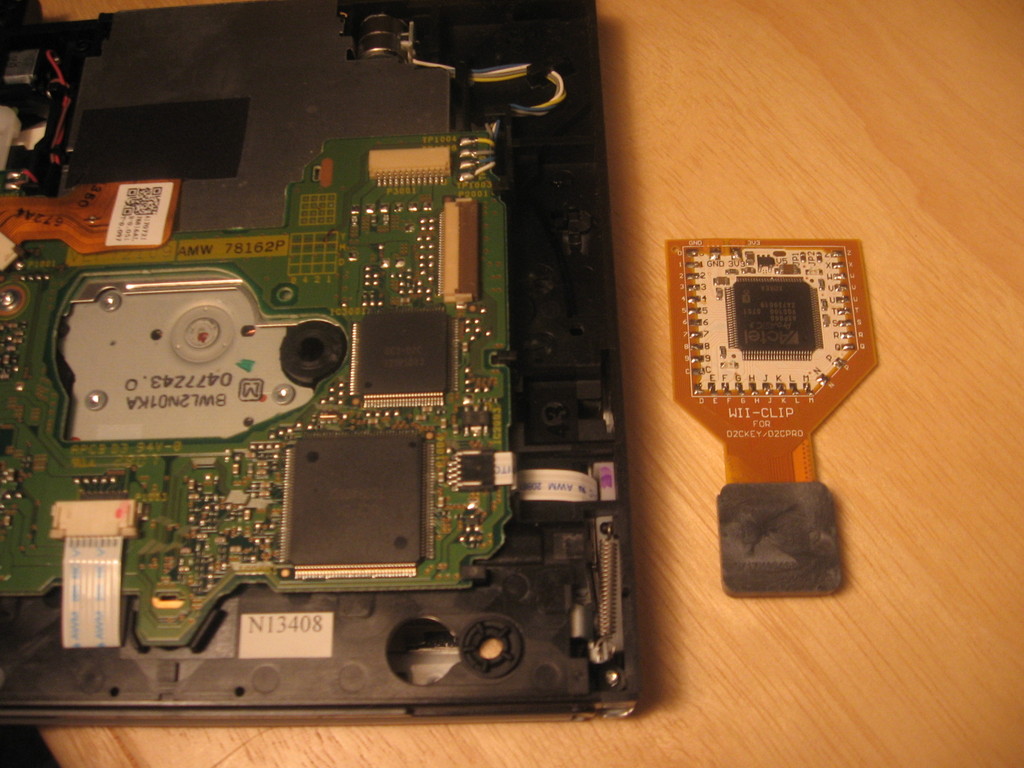
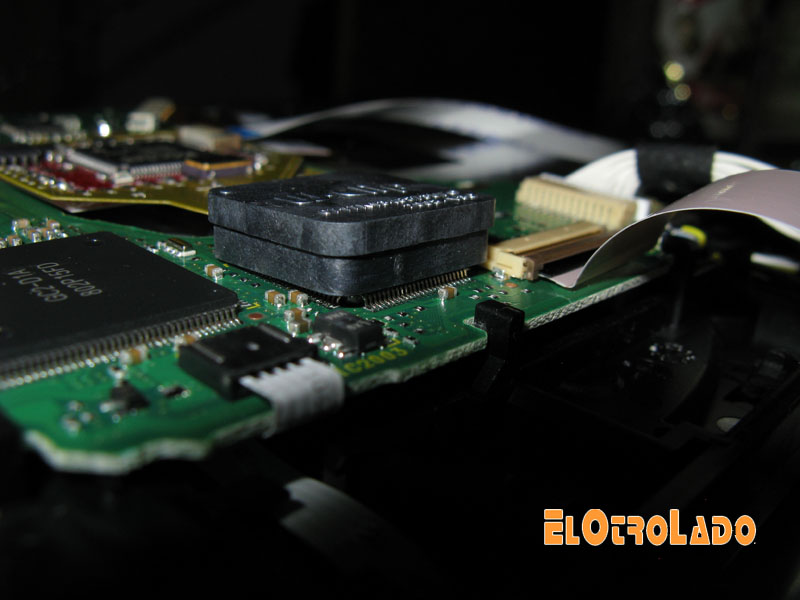
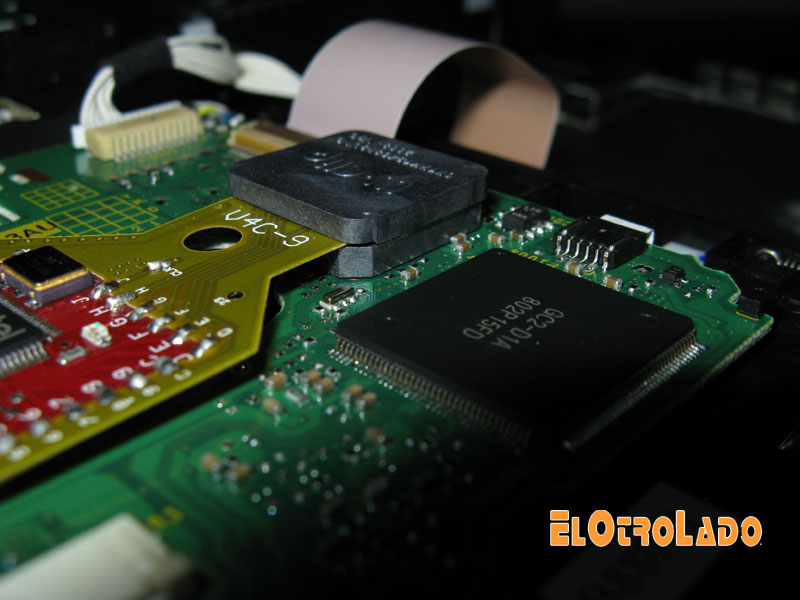
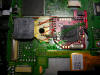
After installing the D2CKey into the Wii-Clip, all that is needed is
to mount the Wii-Clip to the D2C chip on the Wii drive. At first I
had a hard time getting the clip to clip onto the D2C ASIC chip, but
then I found that it was much easier if I started on one side, and
then layed it down to the other. Originally I was pressing straight
down with even force on the clip, but it felt like I was going to
break something so I stopped. I then put the Wii-Clip on one side of
the D2C chip at a 45 degree angle, and then pressed it down onto the
opposite side. This worked much better.

 Side Views:
After the Wii-Clip is mounted to the Wii drive you will need to use
the supplied cardboard insulator (the instruction guide) to cover
the D2CKey/Wii-Clip assembly to prevent open shorts. At this point
the installation is done, and all that needs to be done is test it.
Here are pictures of the final installation with the cardboard in
place and the drive connected:
I will note though, that the cardboard insulator covers the
connector for the drive ribbon cable. I reccommend that you connect
this before installing the cardboard insulator, otherwise you will
not have acces to the connector. Here is a video I made of the test
of the installation:
Conclusion:
In conclusion, I think that the Wii-Key is an excellent tool to help
Wii modders with installing the complex D2C mod chips. In addition
to making the installation much easier, it also makes the removal of
the chip easier. The Wii-Clip company is also developing versions of
the clip for non-D2C mod chips, and these will make it much easier
for modders to update and remove mod chips because nothing will ever
need to be soldered to the Wii drive itself. This also reduces the
risk involved in modding a console. Although the advantages outweigh
the disadvantages in my opinion, there are a couple things that may
or may not be an issue to buyers. First is the cost. The Wii-Clip is
currently retailing at 39.99 plus shipping at
www.ic2005.com.
This is a lot when you consider the cost of the mod chip as well.
Although it is costly to do a D2C mod with the Wii-Clip, I think it
still is a good deal considering the cost of a professional D2C
installation or the cost of a install gone bad. The second issue is
that the Wii-Clip assembly covers the vent hole on the Wii drive (as
pointed out by many others). In my opinion there is still adequate
clearance, and this should not be an issue. However, I do think that
in a future version of the clip this could be fixed by having the
flexible PCB either come out of the corner instead of the side of
the clip, or still come out of the side, but then shape the PCB so
it turns perpindicular to the clip, and then have it turn and
continue laterally to avoid the vent hole. All in all I think the
Wii-Clip is a great tool, and I think it will definately
revolutionize D2C modding, and possibly all forms of modding.
|
--------------------------------------------------------
Review by Greg :
http://www.techsick.com/articles-wii-clip-review.shtml
Wii-Clip v1 Review
First Impressions:
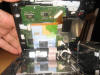
Today we received half of our fist batch of Wii-Clips (it looks
like a few more days until the rest of our order arrives).
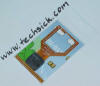
On opening our eagerly awaited delivery we were impressed with the Wii-Clip's
packaging. Cool to look at even without installing.

Most impressive is the high quality of the Wii-Clip itself. We had
expected it to be flimsy like other flex PCB's we have encounted in
the past but it is
actually very sturdy. The Wii Clips flex PCB allows for easy
soldering. The traces on the flex PCB are of a high standard, there
are no right angle
traces, which can cause interference as we have seen in other
modchips and flex PCB's.
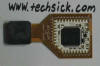
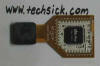
The Wii-Clip has been well thought out and is very clean in its
design. The solderless points align perfectly with the pads on the
D2C Key and D2C PRO
** Note: Please do not confuse the D2C PRO with
the D2Pro - two totally different chips **
*** Note: Wii-Clip will be releasing a v4 for the
D2Pro soon ***
Soldering the D2C Key and D2C PRO to Wii-Clip:
Next we soldered the D2C Pro and D2C Key modchips to the Wii-Clip.
As seen below.
Installed Wii-Clip with D2C PRO Modchip to the Wii:
First we affixed the protective label to the back of the chip

Clipped into place, a perfectly secure fit :-)
Added the other protective label, reassembled the Wii and got back
to playing games.. Perfect end any review.
WiiClip Features and Benefits:
- Because it clips into place securely it won't
come loose
- Can be removed if needed
- Does not require any soldering to the Wii drive
board
- Soldering the D2C Key and D2C PRO to the Wii
Clip is easy
- No need for magnifying glass for installs (or
eye strain)
- Reduces install time by at least 60%
- Faster and easier than any other method
available on the market
- Contact points read well on the multimeter
- No need to spend money on high precision
soldering equipment
- And for the Completely Solderless
D2C Key or
D2C PRO there is no soldering required at all
|
--------------------------------------------------------
By: free1981
Hello, this is my first review in english, because I'm spanish. Sorry for all
writting mistakes that I can do!
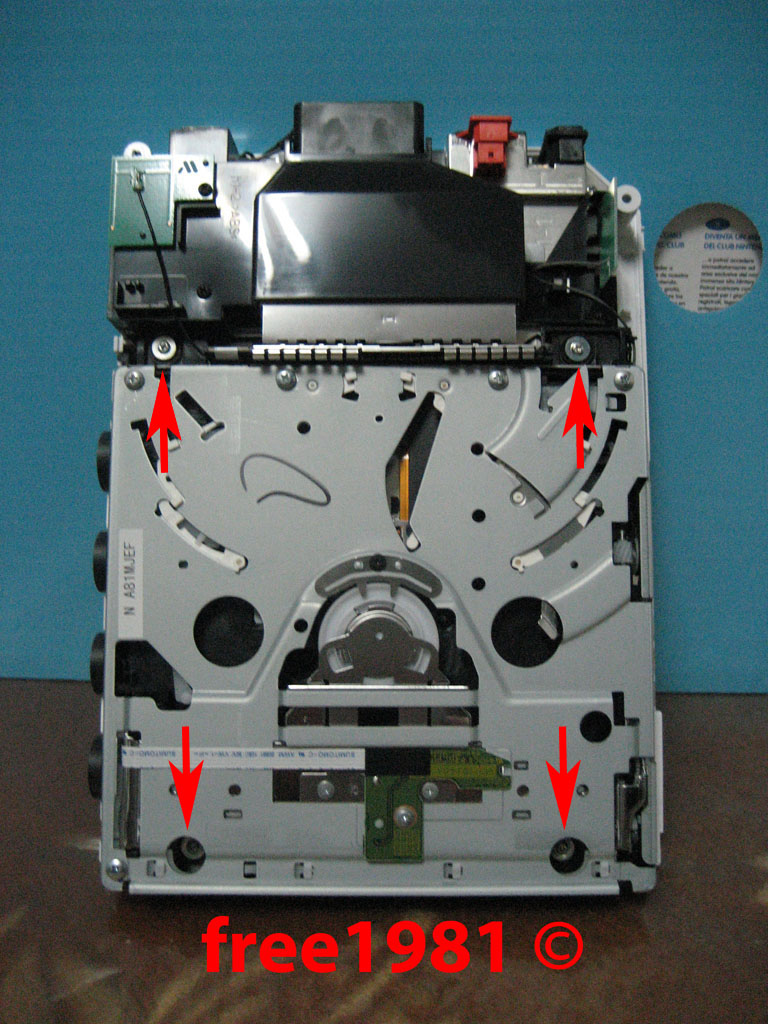
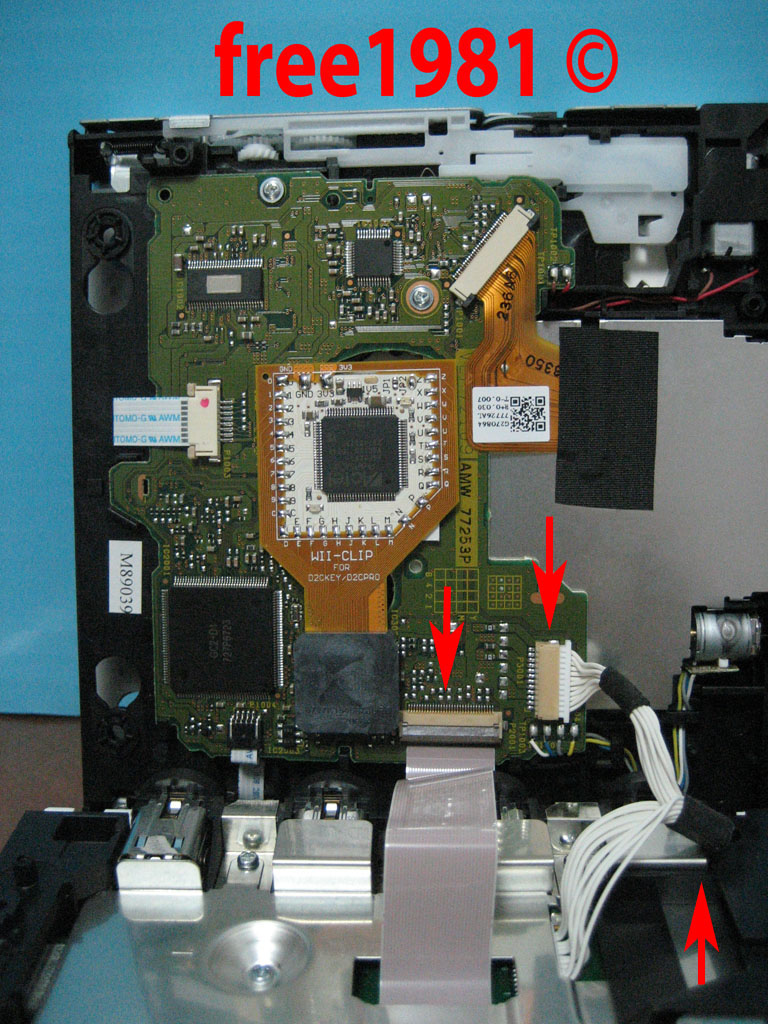
First of all, I suppose that everybody knows how to open a Wii. If somebody
don't know how to do it, search in google, because exists a lot of manuals!!
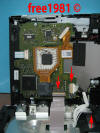
When you arrive to this point, you only have to remove the last 4 screws,
marked with red arrows.

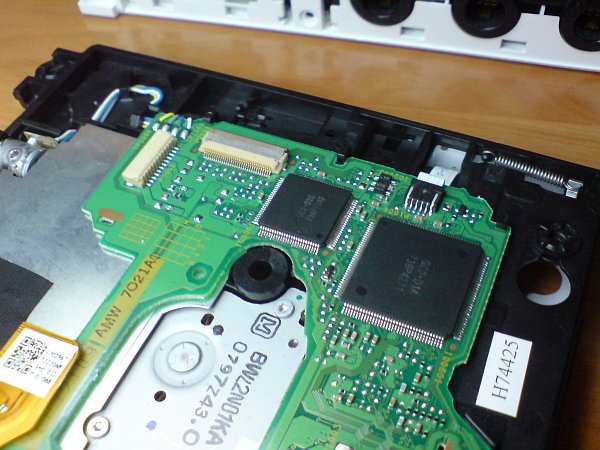
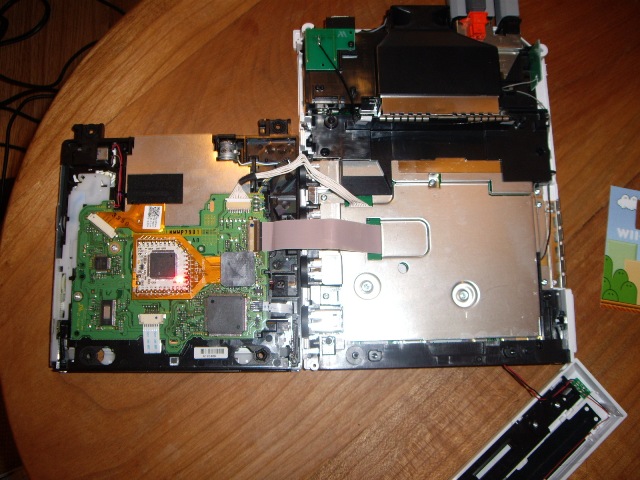
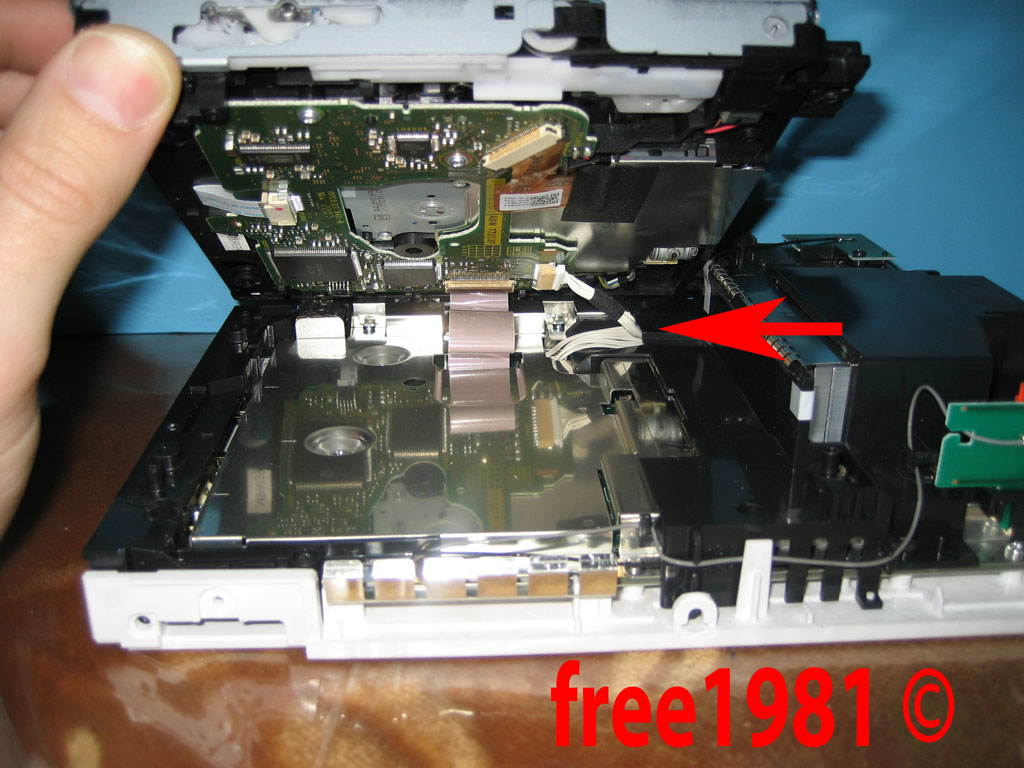
Next, you have to lift the DVD-Rom reader carefully, because a handful of
cables are inserted in one hole, as you see in picture.
When you release the handful of cables, you will be able to release the two
marked conectors easily.
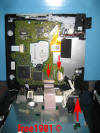
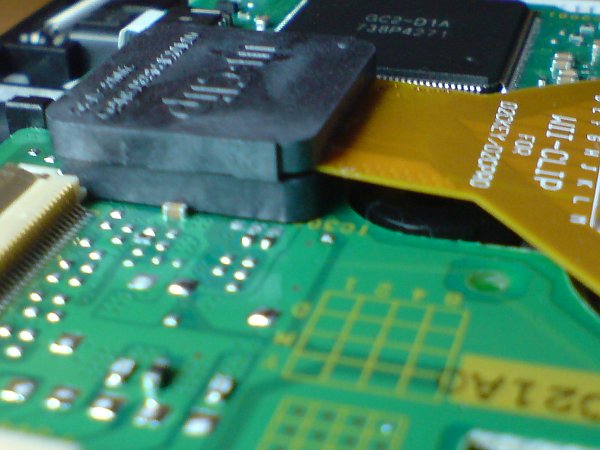
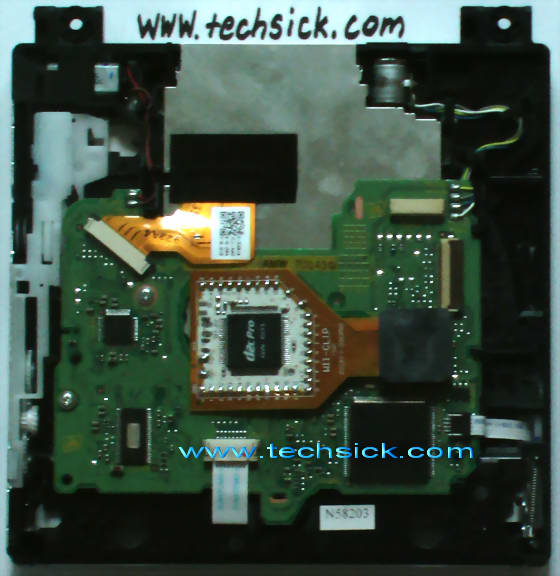
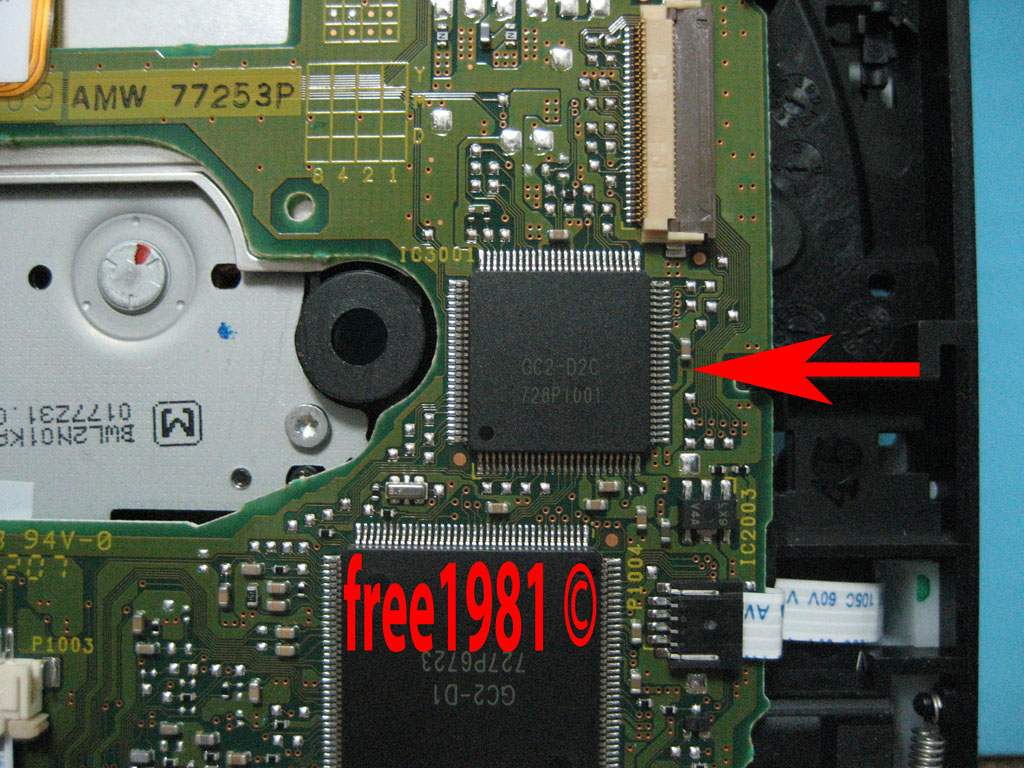
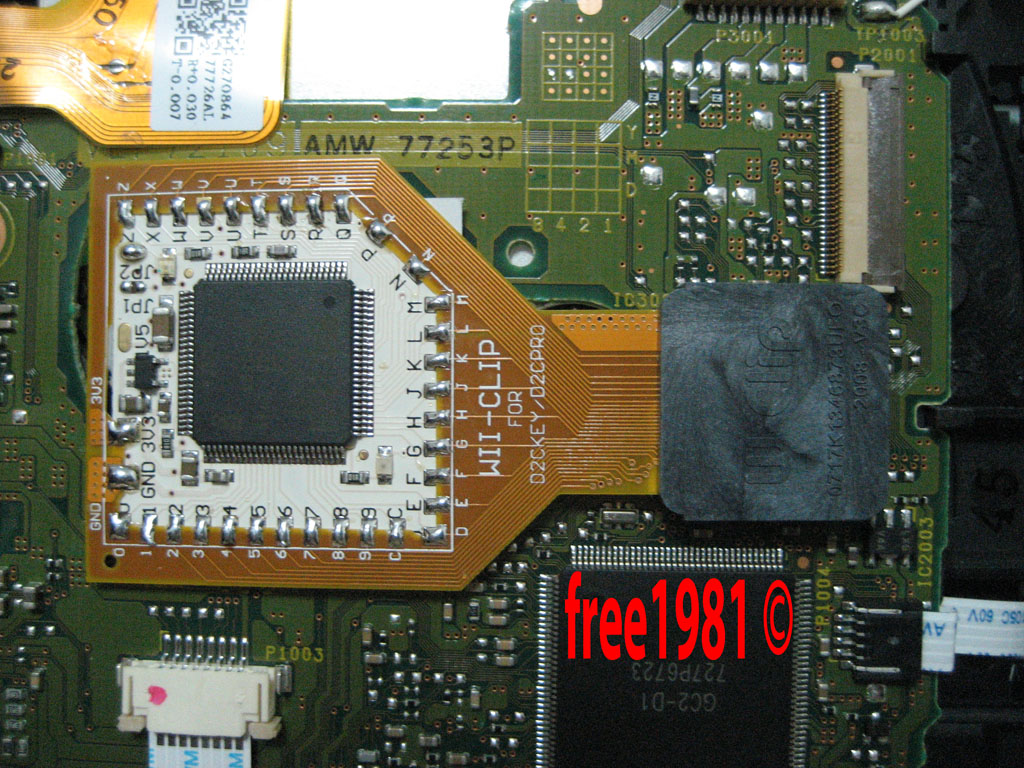
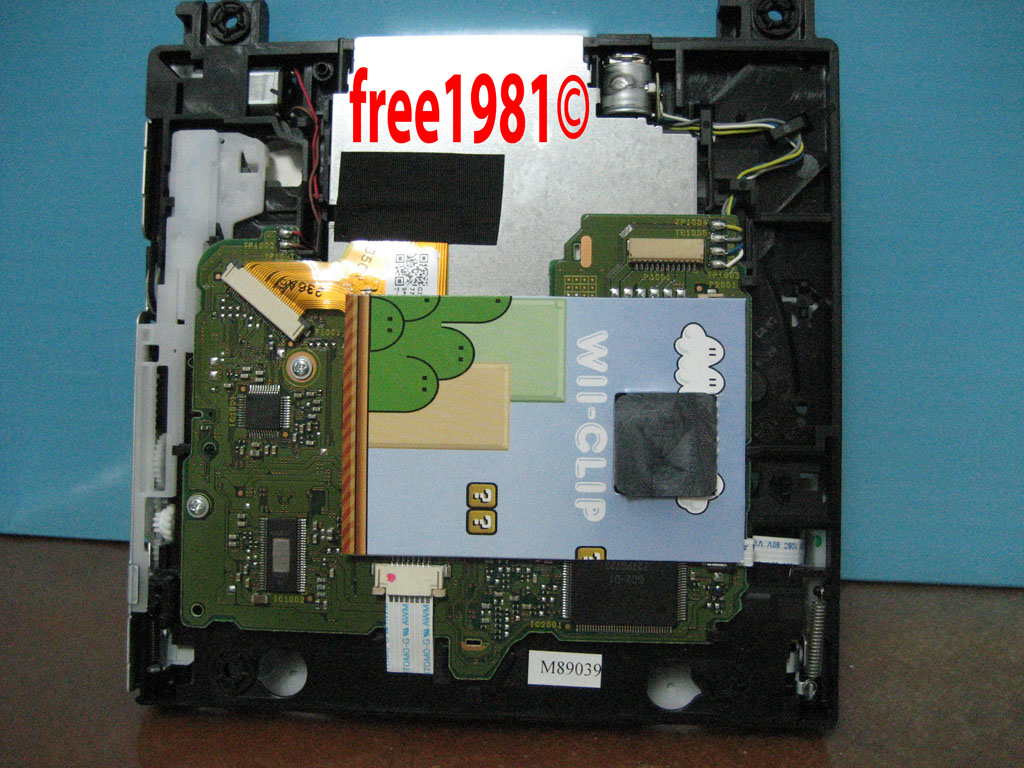
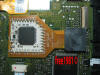
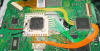
Now you have the DVD-Rom reader ready to put the Wii-Clip.
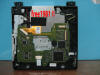
At this point, you have to distinguish the IC that you need to use. That's
the place that you have to put the Wii-Clip with your selected chip, D2CKey or
D2CPro. Don't forget solder all points, close the suitable jumper according to
your region and protect the back side of the chip with the adhesive.

Make presure untill you listen a soft clic, and now you have your own Wii-Clip
installed.
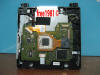
Now you have to connect the flex and the handful of cable, because we have to
test the installation before close the Wii.
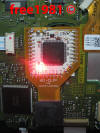
Power on the Wii, and if all is ok, the red and blue leds powers on and
switch off inmediatly. Now you can insert one Wii's Backup and wait to modchip
to boot it. If it happens, red led turns on and blue led flashes.

To end the mod, you have to protect the entire clip with the supplied card
protect.

Now you have to close the Wii and enjoy your Backups.
See you soon in other reviews.
<- ******************************************************************* - >
ACKNOWLEDGMENTS:
- www.ic2005.com for supply the Wii-Clip.
- Quique & Irene for let me to test with their Wii to make the review.
- Pablo for the company and support while i was doing the photos and mounting
the Wii-Clip.
- My family by their time when I'm testing consoles with TV while they are
watching their favourites TV programs.
- An special people who is supporting me on everything that I do and I can
trust him 100%.
--------------------------------------------------------
By: Aaron
|
Wii-Clip with D2CPRO Review
As anybody who has ever done a wire install of a
D2CKey or D2CPRO knows, it should be left to those with good soldering /
modding experience. Its certainly a more involved job than putting in a
simple wiikey.
So where does this leave the DIY modder who is left a
little daunted about the thought of a 30+ wire install? Pretty much
reliant on a pro installer to do the job, that is until now.
Wii-Clip can be a totally solderless solution for the
end user, or a simple 2 mininute soldering job for those that already
have their own D2CKEY or D2CPRO.
Design and build quality are of a very high standard,
and I was immediately impressed with how sturdy the PCB and IC connector
is. Also the high quality gold solder pads flow solder nicely and both
the D2CKEY and D2CPRO line up with no fuss.
Fittng of the Wii-Clip on the D2C IC was so simple
that i felt kind of guilty that there was nothing more to it. Simple
even pressure and the connector just snapped on like magic, I like this
product :)
After checking that all corners of the Wii-Clip were
level it was time to fire up the Wii for testing. Success! That was one
quick D2C mod job, the Wii-Clip is a winner for sure!

UPDATE: I have now done numerous installs of both the
D2CKEY and D2CPRO with the Wii-Clip, and have not come accross any
problems at all. The first 2 consoles I did for testing are still going
strong, with no issues reported..
|
--------------------------------------------------------
By :
 WesTek
 |
Key-Clip 100% Solderless Solution -
Review
The Wii-Clip guys sent me their ATMEGA version of the Wii-clip
(Key-Clip) to test out and
write a review, well Here it is!
V3 Key-Clip (ATMEGA version for Leaked Hex Wiikey).
I must say, when I was first approached by the Wii-Clip guys
to test these out and offer a review on it, I was pretty
curious, and wasn't sure what to expect in the mail.
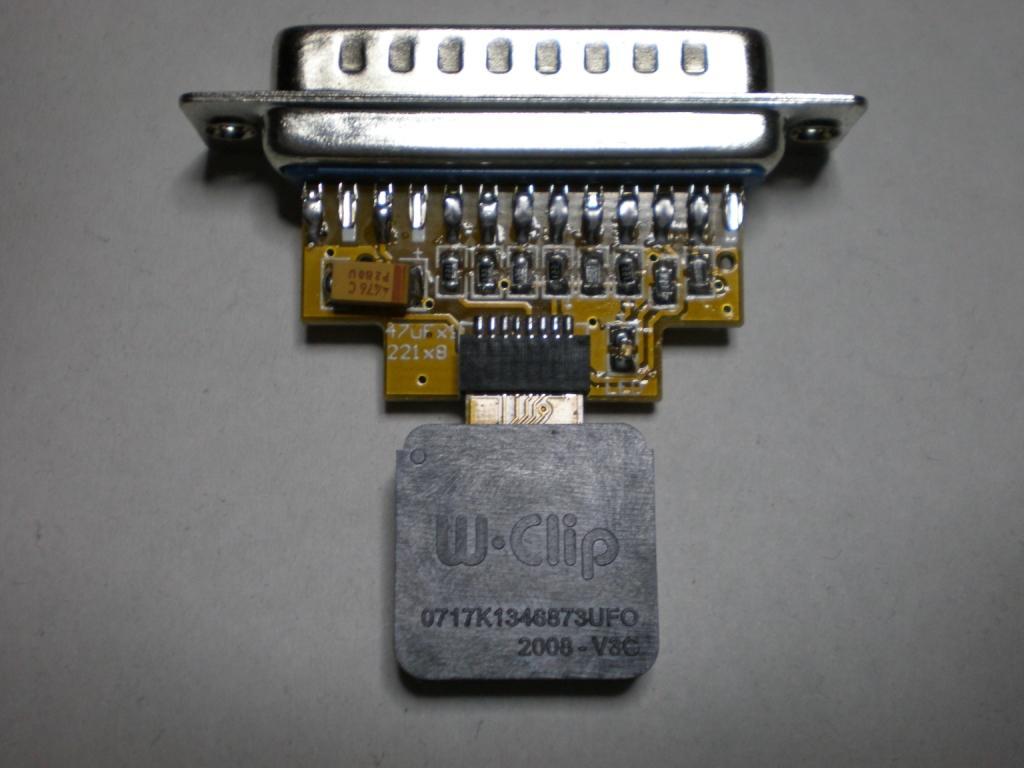
Here is what I got :
Key-Clip (With ATMEGA chip inside!)
Key-Clip Programmer
Basically, this version of the Key-Clip works hand in hand
with my Dumped Hex
Autoprogrammer (Found here on Wiinewz.com). The clip (With
the ATMEGA chip inside the clip) will come blank (For
legality reasons) so all you need to do is download my
autoprogrammer, plug the Key-Clip into the programmer, then
plug the programmer into the parallel port in your computer
and run the autoprogrammer. Bam, flashed like a dream first
try, and the Key-Clip is now ready to attach to the
DMS/D2A/D2B drive chip!.
They have made this so easy to mod your Wii, literally
anyone that can open the Wii case, can mod their Wii with
this. Attach the programmed V3 Key-Clip to the drive chip,
then close her back up because that is all you have to do.
No soldering required at all!! (Be sure the ribbon coming
out of the chip is facing the drive vent hole).
I am very impressed with this Key-Clip and would highly
recommend this for people that are not so good with
soldering. The chip works great. It is updatable using
official Wiikey Update Discs, and configurable using
official Wiikey Configuration Discs. Once it has been
programmed, there will not be any need to re-program it in
the future, so once your Wii has been closed up, you can
keep it that way. You also have the added security that if
somehow the code get's erased in the future by Nintendo or
whoever (Doubtful but not impossible) then you could
re-flash the clip and get it going again!
If you have an older chipset Wii, and don't want to risk
breaking your Wii by attempting to install a mod chip, the
V3 Key-Clip is for you. There are no risks what-so-ever with
this install. Your only risks would be breaking something
while openning your Wii!
-------------------------------
Key-Clip Pros :
100% solderless!!
Easy to program the chip.
Easy to install the chip.
Works on DMS/D2A/D2B chipsets (Does NOT work on Cut Legs I
am sorry to say)
Easy to upgrade via official Wiikey Upgrade Discs.
Easy to configure via official Wiikey Configuration Discs.
Price is VERY reasonable (Approx $40.00 - Includes Clip AND
Programmer)
Key-Clip Cons :
Only down side I see to this clip is the fact it does not
work on cut leg model Wiis. Oh well!
------------------------------
Hats off to the Wii-Clip team for their very innovative
product!
Check out their site at
www.wii-clip.com
- WesTek |
|
--------------------------------------------------------
--------------------------------------------------------
By : Wayne Hom
Hello there,
I just wanted to say Thank You for this. I had put off modding my Wii
for a long time just because of the difficulty of soldering the fine
points. As soon as I saw this mentioned, I searched and searched until I
found a place to purchase.
I live in the US, and had to make my purchase in Australia. No problem,
I could wait. As soon as I got my package in the mail, I was all ready
to operate. In preparation for this, I found out all I could on how to
open up the Wii properly, just to make sure they were all consistent.
It had been quite a few years since I had soldered, and I should have
done some re-training. My first few drops of solder didn't hit where I
thought they would, and I had even bridged a few contacts. Fortunately,
I quickly fixed it, and finally got the hang of soldering again.
Anyway, it took:
15 minutes to solder D2CPro to V1 Wii-clip
15 minutes to carefully open the Wii (and keep track off all the screws
and parts)
1 minute to plop Wii-clip onto my D2C chip
1 minute to make sure it was snug and tight
10 minutes to carefully put the Wii back together.
Total time: 42 minutes
I'm sure I can cut that down to 15 minutes if I had to do more.
Again, thanks for a great product.
Wayne Hom
|
--------------------------------------------------------
By : bandit
Wii-Clip Easy Install Modchip Kit
http://reviews.dcemu.co.uk/review-wii-clip-easy-install-modchip-kit-113292.html
Overview : The Next Generation Universal WII CHIP Install
Tooling!
Features :
- Support for full series WII CHIP, included WIIKEY , D2CKEY ,
D2CPRO , ARGON , D2PRO, WASABI chips, very high install efficiency,
you can finish most jobs in 2 minutes.
- Very easy to install. You just need to solder the chip to the
1:1 points. Then push it cover over the D2C chipset on the drive,
plug and play, even don't need the extra wires for VCC and GND ,
100% ZERO wires need!
- Very easy to disable the WII chip, just remove (pull out) the
WII-CLIP from the WII motherboard, no need to unsolder anymore. This
process will allow you return your WII to its stock configuration,
can give back you one 100% original WII immediately.
- Next generation HIGH precision design, 100% working perfect and
stable.
- Use the special IC encapsulation material, whole wii-clip
working like a small radiator, without any overheating issue. We
have keep it run over 720 hours to confirm this point.
Quality/Usability : Let me start off by saying that I wont be
reviewing any specific chips in this review. This is solely based on Wii-Clip
and what it can do.
So not everyone is a modder or even handy with their hands or just plain
scared to do it themselves. I fall under all three departments. I'm not
ashamed to admit it. What Wii-Clip aims to do is not only help those who
are scared or inexperienced, but to make installation a lot easier even
for the pros.
When modding a Nintendo Wii, the most scariest party is damaging to
motherboard. One mistake and it can fry your Nintendo Wii dead! With the
Wii-Clip, you dont have to worry about causing damage to your Nintendo
Wii. All you do is snap the Wii-Clip over the Nintendo Wii's chipset and
you're done! No more soldering wires onto the Nintendo Wii. You dont
even have to use wires for the modchips.
There are different Wii-Clips available for each modchip. You have
WiiKey, D2Ckey, D2Pro, Argon, Wasabi, even open source such as OpenWii,
Wiinja, WiiFree and many more. As new modchips become available or even
upgraded ones, Wii-Clip will have one.
As I mentioned above, I'm not handy when it comes to soldering or
modifying electronics. But I was able to do it. Of course, I borrowed a
friends soldering iron and had an old PC motherboard laying around. Once
I felt comfortable and confident enough, I dove right in. Simply line up
your modchip to the Wii-Clip and solder the points together. No more
need for wires or soldering to your Nintendo Wii. However, to ensure
that the modchip will line up with the Wii-Clip, I first soldered on one
corner. Once that was soldered, I soldered a corner opposite from my
first spot. My method was similar to that of tightening lug nuts on a
car tire. With this method, if I so happen to move the Wii-Clip or
modchip accidently, it wont be misaligned.
Once all the points are soldered on the modchip and Wii-Clip, it was now
time to install it onto the chipset on the Nintendo Wii. But before
doing so, you must take the "PROTECT LABEL" sticker and place it under
the modchip. This prevents any points on the modchip from touching the
Nintendo Wii motherboard. Now take the Wii-Clip, place it over the
chipset and push down. Some down force will be needed to make sure that
the Wii-Clip is tightly in place and will not fall off. At first, I felt
scared because the Wii board was bending but it held up and is sturdy.
Once in place, take the decorative Mario looking background paper. Not
only is it used for packaging but its also used to protect the modchip
from touching the Nintendo Wii. Just rip off the flap in the middle and
fit the Wii-Clip through the opening.
As stated above, the Nintendo Wii was only disassembled and none of the
components were soldered or tampered with. This keeps the Nintendo Wii's
warranty still intact if a problem ever arises. Even if you no longer
wanted the modchip, there is no damage to the Nintendo Wii.
Before closing up the Nintendo Wii and to ensure that the Wii-Clip
worked, I turned on the Nintendo Wii and it worked. Inserted both an
original Wii game and a backup and both worked flawlessly. Once I knew
it was working, I closed everything back up and tested the games again
and experienced no problems.
When removing the Wii-Clip, it was a bit tough to remove. Wii-Clip
suggested using a sharp object but I used a small flat-head screwdriver.
They also mentioned to pry from the corners only and from all 4 sides.
Conclusion : Overall, the Wii-Clip Easy Install Modchip Kit is
probably the most easiest and safest method of installing a modchip. No
damage is done to the Nintendo Wii. Even if you messed up the soldering,
its on the modchip and Wii-Clip. If for whatever reason you totally
screwed it up and no longer works, you only have to pay for the chip and
Wii-Clip. Its a lot better than having to hunt down for a Nintendo Wii
and spending $250USD for a new one.
The Wii-Clip comes in an assortment and is available for WiiKey, D2Ckey,
D2Pro, Argon, Wasabi, even open source such as OpenWii, Wiinja, WiiFree
and many more. So no one is left out! Whats great is that if you have
multiple modchips and for whatever reason a game does not work, you can
simply open up your Wii and swap the Wii-Clip with modchip.
|
--------------------------------------------------------
Quería presentar, gracias a nuestro patrocinador DiscoAzul, esta
review del nuevo Wii-clip V4C como solución clip para los D2Pro9.
El formato en el que se venden estos clips es el siguiente:
Ahora voy a detallar los pasos a seguir para utilizar este clip.
- Código:
Seleccionar todo
Materiales Necesarios

				- Wii-Clip V4C

				- D2Pro9

				- Herramientas para abrir la consola
El primer paso es conseguir el wii-clip, las herramientas y el
D2Pro9, ya sea comprando este modelo directamente, o bien
transformar el modelo anterior con la memoria SPI que se incluye al
comprar el programador.
Transforma tu D2Pro a D2Pro9 escribió:Para
realizar esta operación consulta el
hilo de Flash78, que lo completo con un
post con otras imágenes y forma de utilizar el d2prog
El d2Pro9 sobre el clip tendrá la siguiente orientación:
Como recomendación para facilitar su soldadura, podemos utilizar la
ayuda de cinta aislante como se puede ver en la siguiente imagen:
Los d2pro9 los están vendiendo con un código que no es el último,
así que será necesario actualizarlo:
Una vez todo terminado, soldamos y ya tenemos el Wii-Clip V4C con
d2Pro9 listo para usar! (recuerda unir el jumper, CLK)
El segundo paso es abrir la consola.
Abre tu Wii escribió:Para esto consulta la
guía de N3TKat, con la recomendación de que no es
necesario ni desconectar la faja que separaría el frontal de
la Wii, ni los dos cables que sujetan el lector.
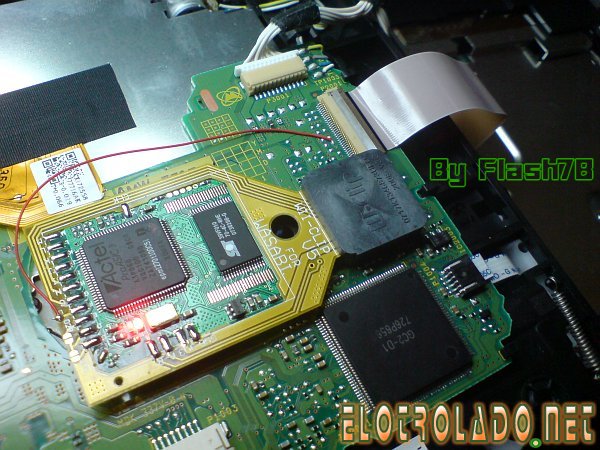
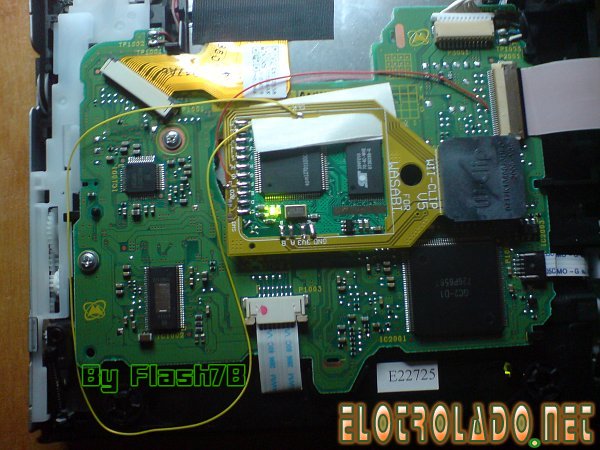
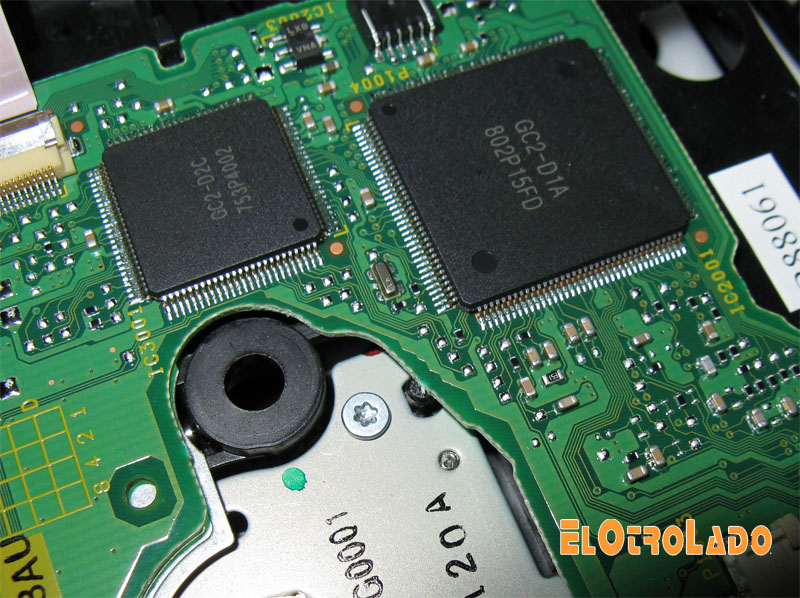
Ya tenemos nuestro lector D2C que vamos a "chipear":
El clip que hemos preparado antes:
Que le ponemos la pegatina de protección para la parte de abajo:
Dejamos caer el clip sobre la controladora D2C:
Y con apenas presión se quedará ajustado:
Y el resultado final obtenido que va perfectamente
 :
Así quedaría el cable de datos:
Video de prueba:
|
|
| |
|
--------------------------------------------------------
|
por
kytu 31 May 2008 23:47
Hola, gracias al equipo Wii-clip por proporcionarme una serie de
Clips para review y a Flash78 por prestarme el D2Pro mas SPI y un
Infectus para otra review.
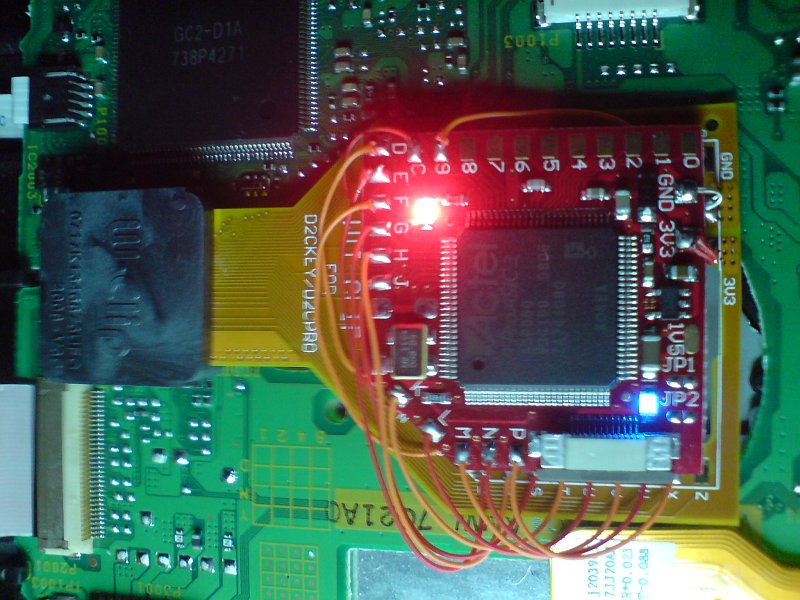
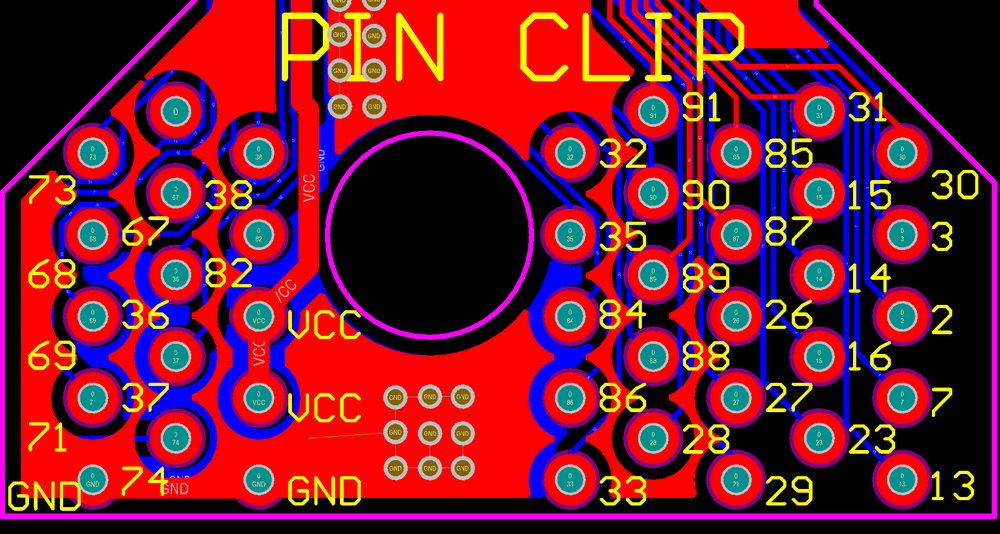
Os presento el PIN-CLIP, un clip diseñado para cualquier
controladora, sea DMS, D2A, D2B o D2C, compatible con cualquier chip
aunque en algunos ay que soldar algún punto a la placa, como es el
caso del D2Pro 9 cables.
Para saber que puntos soldar teneis que ir a la pagina oficial donde
salen algunos chips con sus respectivos puntos
http://www.wii-clip.com/PIN-CLIP.htm, de todas formas
aquí tenéis un esquema muy general con la numeración de todos sus
puntos

Aquí os muestro unas fotos de la instalación que e echo yo,
próximamente pondré una con el wiinja instalado.
Materiales utilizados:

Una vez soldado
Instalado en la placa, ay que añadirle el punto C ya que
este no viene dentro del PIN-CLIP
Y el resultado es:
A pesar de tener los puntos de corriente en el propio clip creo que
es mejor soldarlo directamente a la placa, una por que queda mas
ordenado y la otra porque así no le quitamos corriente a la
controladora, aunque esto no suponga ningún fallo.
El punto J esta soldado directamente a al pin 82, pero si no
funcionara, se podría cambiar al punto que ay al lado del conector
marrón y que se muestra en el
esquema de instalación del D2Pro 9 cables.
Sin mas preámbulos me despido espero que a alguien le sirva esta
review y que la disfrutéis
![[ginyo]](review/guinyo_ani1.gif "guiñando")
Gracias de nuevo a Flash78 por dejarme alojar las fotos en su
servidor
![[risita]](review/sonrisa_ani1.gif "risita") |
--------------------------------------------------------
|
por
kytu 01 Jun 2008 01:19
Gracias a el Team Wii-clip por enviarme una muestra del Wii-clip V4C
y a Flash78 por prestarme un D2Pro + SPI y alojarme las fotos.
A pesar de que CyBeR PeReZ ya izo esta review este clip esta
pensado para los dos chips el D2Pro9 y el D2Pro 9 cables +
SPI, a pesar de ello los puntos no coinciden demasiado bien.
Una vez soldado ponemos la SPI encima y unimos los puntos
GND, 0, 1, 2 y 3 y el punto 3v3 mediante un cable a donde os
indico a continuación
La instalación es sencilla, se posiciona el clip sobre el
D2Pro haciendo que coincidan los puntos F o G de ambos y a
la altura del C que esta en vertical, se sueldan y el resto
se suelda con la desviación que llevan procurando que
ninguno haga corto con otro, sobre todo el punto J con el
pin del reloj. Podeis soldar el resto de puntos para fijar
mejor el clip, pero no son necessarios.
Recordad que ay que unir el jumper CLK para unir al punto J
al clip, si no funcionara habría que retirar el jumper y
soldar un cable desde el punto J a su correspondiente en la
placa.
Una vez puesto en la placa no hace falta soldar ningún cable
mas a excepción del J si no funciona bien, quedaría así:
Saludos y espero que os sirva de ayuda. |
--------------------------------------------------------
More reviews are coming ......
--------------------------------------------------------

investing Counter